Self propelled lawnmower
From DDL Wiki
Contents |
Major Stakeholders and Needs
The self-propelled lawn mower has drastically improved the efficiency and quality of lawn mowing since the era of the push mower. The stakeholders involved include the customer, the manufacturer, the supplier of raw materials, and lawn owners. The customer can be anyone from a lawn owner to a commercial lawn mowing business. The customer must be ensured efficiency, quality, safety, and convenience. Therefore, it is essential that the self-propelled lawn mower is not too cumbersome, heavy, and well enough secured so that a customer of any size or strength can safely and effectively cut any lawn. This is also important when considering the lawn owner because the owner desires an attractive lawn, but wants to achieve this as quickly as possible so as to utilize the lawn. The manufacturer is responsible for producing a vast quantity of operative and safe lawn mowers, which can only be attained through the efficient and reliable shipment of raw materials from the raw material supplier.
Part List
| Part # | Name | Weight | Quantity | Function | Material | Manufacturing Process | Image |
|---|---|---|---|---|---|---|---|
| 1 | Front Wheel | 2 | Attaches to the front of the mower and allows the mower to roll horizontally | Plastic | Plastic Mold Injection | Image:LawnMowerRWheel.JPG | |
| 2 | Rear Wheel | .5kg | 2 | Drives the Lawnmower, translates drive shaft motion into horizontal movement | Plastic | Plastic Mold Injection | 
|
| 3 | Rear Wheel Drive Gear | 2 | Translates the rotational motion of the drive shaft gear into rotational motion of the the wheel. Also the particular gearing provides more torque to the wheels. | Steel | Cast, Turning, milling | 
| |
| 4 | Drive Gear Shield | 2 | Keeps grass and other particle from getting in to the drive gear mesh, also keeps the gears from leaving the gears. | Black ABS Plastic | Plastic Mold Injection | ||
| 5 | Shoulder Bolt | 4 | Attaches the wheel to the Pivoting arms with are then attached to the deck of the mower, allows the wheel to spin freely about the smooth section of the of the bolt. | Steel | Forged and rolled | ||
| 6 | Deck | 1 | Houses the motor, and has separator areas where all of the different assemblies of the mower attach and connect into one. Also provides protection to the user from the spinning blade. | Aluminum | Cast |
| |
| 7 | Front Pivot Arm | 2 | Allows you to easily adjust the height that the front wheels will be at. Allows for cutting different lengths of grass. | Steel and ABS Plastic | Stamped steel with riveted peg. Plastic mold Injected, press fit together | ||
| 8 | Rear Pivot Arm | 2 | Allows you to easily adjust the height that the rear wheels will be at. Allows for cutting different lengths of grass. | Steel | Cast, Milled, and Tapped | ||
| 8 | Front Pivot Arm Bolt | 2 | Fastens the Front Pivot Arm to the lawn mower deck. It allows the poiot arm to rotate in this slot to e prvide different wheel heights. | Steel | Forged and Rolled | ||
| 9 | Tension Washer | 2 | Provides an even surface for the Tension Spring to seat itself on. | Steel | Stamped |  | |
| |
| 10 | Drive Train Gear | 2 | Uses the rocking key to engage the drive shaft and there for provide power to the wheels. It has slots on the inside radius where the rocking key turns and grabs hold of the gear. | Steel | Forged, and turned | 
|
Design for Manufacture
FMEA
FMEA (Failure mode and effects analysis) is used to determine the potential problems with designs. It takes each component in a mechanical system and analyzes its failure modes and effects using three main criteria. These criteria are severity of the failure (S), probability of occurrence of the failure (O), and ease of detection of the failure (D). Each of these is ranked on a scale of 1 to 10. For severity, 1 is least severe and 10 is dangerous or catastrophic failure. For probability of occurrence, 1 is very unlikely and 10 is almost certain. For ease of detection, 1 is easiest to detect and 10 is impossible to detect. Once each component is assigned one number for each of the three criteria, the numbers are multiplied together to determine the RPN (risk priority number). This number can range from 1 to 1000. The higher the RPN for a specific component the greater the chance that this component needs to be looked at and improved. Along with assigning a numerical value to the risk of certain components, FMEA also attempts to determine the origin of the problem and possible solutions to improve components. It is important to note that design controls and recommended actions are intended to help the manufacturer improve the problem. The following table provides an FMEA analysis for the key components of the lawnmower.
| Item | Function | Failure Mode | Effects of Failure | S | Causes of Failure | O | Design Controls | D | RPN | Recommended Actions | Responsibility and Deadline | Actions Taken | S | O | D | RPN |
|---|---|---|---|---|---|---|---|---|---|---|---|---|---|---|---|---|
| Wheels | Translate power from drive shaft to horizontal motion | Plastic dries out and cracks | Mower can get stuck and won't move | 8 | Use of mower in dry weather too often | 5 | Use plastic that is less likely to dry out | 2 | 80 | Fatigue testing | Wheel manufacturer | 8 | 5 | 2 | 80 | |
| Wheels | Translate power from drive shaft to horizontal motion | Plastic dries out and cracks | Mower can get stuck and won't move | 8 | Use of mower in dry weather too often | 5 | Use plastic that is less likely to dry out | 2 | 80 | Fatigue testing | Wheel manufacturer | 8 | 5 | 2 | 80 | |
| Blade | Cut grass | Dulls | Grass cutting in ineffective | 8 | Natural wear with time | 7 | Use harder material that is less likely to dull | 2 | 112 | Fatigue testing | Design engineers | 8 | 7 | 2 | 112 | |
| Blade | Cut grass | Rusts | Grass cutting is uneven | 8 | Natural wear with time | 7 | Use material that does not rust | 3 | 168 | Waterproof coating | Design engineers | 8 | 7 | 3 | 168 | |
| Belt | Transfer power from engine to transmission | Rubber dries out and breaks | Rear wheel drive won't work | 6 | Use of mower in dry weather too often | 5 | Provide extra belts with mower | 5 | 150 | Analyze tension in belt | Design engineers | 6 | 5 | 5 | 150 | |
| Tires | Provide traction on wheels | Tread wears with time | Mower will lose traction and ability to climb hills | 4 | Natural wear with time | 7 | Consider different tread pattern that takes longer to wear | 1 | 28 | None, unlikely occurrence | 4 | 7 | 1 | 28 | ||
| Rear Wheel Gears | Gears down power from engine to rear wheels for increased torque | Teeth break | Rear wheels will not turn evenly or consistently | 1 | Too much strain on rear wheels | 2 | Consider different material for gears | 9 | 18 | None, unlikely occurrence | 1 | 2 | 9 | 18 | ||
| Cables | Attach to mounting bracket to engage transmission | Stretch | It will be difficult for the user to engage drive mechanism | 4 | Overuse of drive system | 5 | Improve connection points | 7 | 140 | Failure tests of connection points | Design engineers | 4 | 5 | 7 | 140 | |
| Cables | Attach to mounting bracket to engage transmission | Break | User cannot engage drive mechanism | 1 | Overuse of drive system | 2 | Lower required tension in cable by adding a system that provides mechanical advantage | 1 | 2 | None, unlikely occurrence | Design engineers | 1 | 2 | 1 | 2 | |
| Gas Tank | Holds fuel for engine | Leak | Engine will not be able to operate | 6 | Puncture from debris | 4 | Locate critical puncture points and reinforce them | 6 | 144 | Puncture testing | Design engineers | 6 | 4 | 6 | 144 | |
| Wheel Brackets | Allows user to change ride height and attaches wheels to chassis | Knobs for changing height break | Height cannot be changed | 8 | Constant Pressure on weld seam | 7 | Replace with removable piece so that it can be easily replaced if it does break | 1 | 56 | Knob redesign | Design engineers | 8 | 7 | 1 | 56 | |
| Wheel Brackets | Allows user to change ride height and attaches wheels to chassis | Constant bending can cause plastic deformation | Bracket is at risk of breaking | 7 | User bends bracket too much when changing height | 4 | Use material with a higher elastic modulus | 1 | 28 | None, unlikely occurrence | 7 | 4 | 1 | 28 | ||
| Driveshafts | Transfer power from transmission to rear wheels | Shear | Rear wheel drive won't work | 1 | Engaging rear drive while rear wheels are stuck | 1 | Reanalyze the key points where the driveshaft is attached | 2 | 2 | None, unlikely occurrence | 1 | 1 | 2 | 2
|
Mechanical Analysis
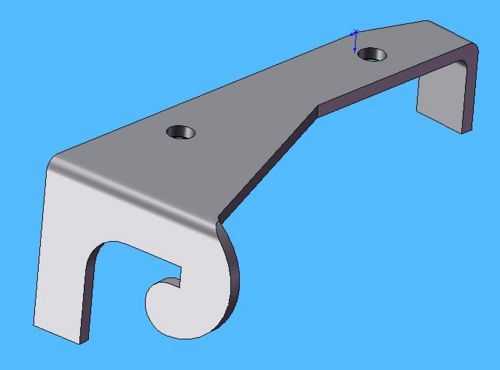
For the mechanical analysis we decided to examine a key bracket on the transmission casing. This bracket (Pulley Tightening Bracket, part number 17 on the parts list) is mounted to the top of the transmission casing by two quarter inch bolts. When the user pulls the lever to engage the drive mechanism a cable tightens and pulls on this bracket. This forces the entire transmission to rotate upwards about the axis of the driveshaft, engaging the transmission via a pulley that is connected to the engine. The purpose of this exercise is to estimate the amount of force required by the user to keep the drive system engaged. This will involve a static analysis of the pulley tightening bracket. Once the tension in the cable is determined, we can employ FEA to locate the maximum stresses in the bracket and possibly optimize it.
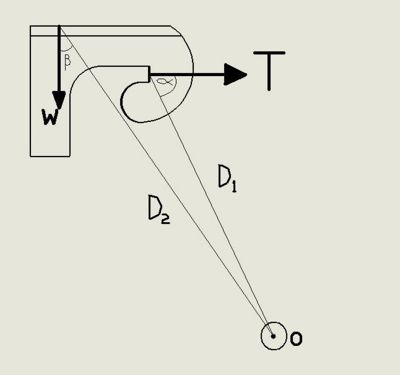
The above figure is a side view of the pulley tightening bracket. ‘T’ is the tension in the cable; ‘W’ is the weight of the transmission; ‘O’ is the axis of the driveshaft; ‘D1’ is the distance from the point on the bracket where the tension is applied to the axis of the driveshaft; ‘D2’ is the distance from the bolt holes on the bracket (where the weight of the transmission is focused) to the axis of the driveshaft; ‘α’ is the angle between the direction the tension is applied and D1; ‘β’ is the angle between the direction that the weight of the transmission is acting and D2. Since the system is in static equilibrium we can sum moments about point ‘O’ and set it equal to zero (taking counter-clockwise to be positive).
∑ Mo = 0 = TD1sinα – WD2sinβ
Solving for T,
T = WD2sinβ/D1sinα
Plugging in all known values we are able to closely estimate that the tension in the cable, ‘T’, is equal to 13 pounds.
The following image is a Solidworks model of the pulley tightening bracket.
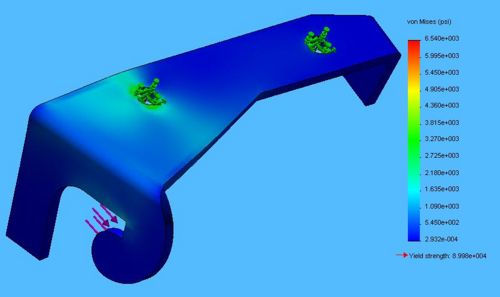
The following image is a stress plot of the bracket with a tension force of 13 pounds applied to the connection point of the bracket and the cable. This plot shows that the maximum stress in the bracket is 6,540 psi and the yield stress of the steel is 89,980 psi. This gives a factor of safety of 13.76 which is well within the acceptable range and will be the basis for maintaining during optimization.
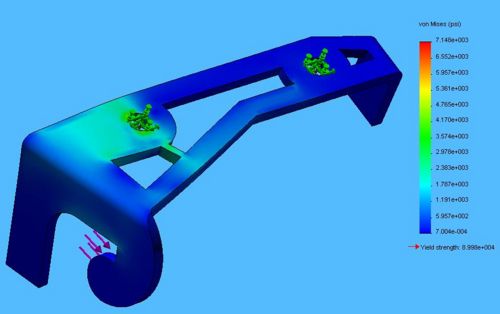
As it is now, the bracket has a weight of 0.23 pounds and a volume of 0.83 cubic inches. Optimization was done to remove excess material in areas of low stress concentrations. The following image shows a stress plot of the bracket after the optimization.
After optimization, the bracket has a mass of 0.20 pounds and a volume of 0.70 cubic inches. The new value for the maximum stress is 7,148 psi. This maintains a factor of safety of 12.59 which is still within the acceptable range. With this new design, each unit will save 0.03 pounds of material. When produced on a large scale this may have a significant effect on material costs if the excess steel is recycled. It then becomes an issue of whether or not it will be cost effective to change the dies in the stamping machine to cut out the new pattern.
