Ratcheting screwdriver
From DDL Wiki
(→Customer Uses) |
|||
| Line 29: | Line 29: | ||
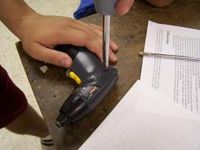
A ratcheting screwdriver is used for loosening and tightening screws. The advantage of a ratcheting screwdriver over a regular screwdriver is rather than having to change your hand position after every half turn or so, the user just keeps their hand in the same position on the handle and rotates the handle clockwise and then counter-clockwise, or vice versa, repeatedly until the screw is tightened or loosened to the user's desire. The ratcheting screwdriver can also be used as a regular screwdriver if desired. | A ratcheting screwdriver is used for loosening and tightening screws. The advantage of a ratcheting screwdriver over a regular screwdriver is rather than having to change your hand position after every half turn or so, the user just keeps their hand in the same position on the handle and rotates the handle clockwise and then counter-clockwise, or vice versa, repeatedly until the screw is tightened or loosened to the user's desire. The ratcheting screwdriver can also be used as a regular screwdriver if desired. | ||
| + | <br /> | ||
[[Image:Rscrew use.jpg|200px]] | [[Image:Rscrew use.jpg|200px]] | ||
Revision as of 22:14, 23 September 2007
Executive Summary
Customer Needs
Easy to Use
-ratcheting/electric
-portable
-interchangeable bits
Practicality
-screwing/unscrewing
-affordable
-comfortable
-durable
System Functionality
Ratcheting Screwdriver
On the interior of the head piece of the screwdriver, there is an internal ring gear that connects with 2 pawls on the base piece of the screwdriver. The pawls are located at the front of the base piece, each consisting of a flat side and a curved side. When both are engaged, the ratcheting motion is locked, and the device acts as a regular screwdriver. A switch depresses either of the 2 pawls, pushing one into a recessed area and leaving the other engaged. With one pawl depressed, the gear is free to ratchet in one direction. A switch on the handle of the screwdriver allows the user to easily switch from depressing either of the pawls, or leave both engaged
Portable Electric Screwdriver/Drill
Power for the Portable Electric Screwdriver/Drill starts with a simple rechargable battery pack. This leads directly to the switch box and trigger mechanism assembly. When the trigger is depressed, current is allowed to flow through the wire, turning the motor. When the trigger is depressed the other way, current is allowed to flow in the other direction. This in turn allows the motor to move in reverse. Attached to the other end of the motor is a planetary gear set. Gearing down allows a small motor to run at high rpm and achieve high output torque. To the end of gear set the drill shaft is attached.
Also attached to the battery is a chip and a series of lights that identify how much power is left in the battery. A female adapter is also attached to allow the power cord to recharge the battery.
Customer Uses
A ratcheting screwdriver is used for loosening and tightening screws. The advantage of a ratcheting screwdriver over a regular screwdriver is rather than having to change your hand position after every half turn or so, the user just keeps their hand in the same position on the handle and rotates the handle clockwise and then counter-clockwise, or vice versa, repeatedly until the screw is tightened or loosened to the user's desire. The ratcheting screwdriver can also be used as a regular screwdriver if desired.

A portable electric screwdriver is used for the same purposes as a regular screwdriver or a ratcheting screwdriver. The portable electric screwdriver is useful because it requires no rotational user input, the user only needs to keep pressure applied to the screw-head, by pushing on the handle, just like a regular or ratcheting screwdriver.

Design For Manufacture and Assembly (DFMA)
Design For Environment (DFE)
Ratcheting Screwdriver:
The power generation and supply for building 1 million dollars worth of ratcheting screwdrivers is 197 millions tons of CO2 and 2.4 million tons of CFCs, which are both considered greenhouse gases (resource 1). The power used to create the ratcheting screwdriver is mainly provided by coal power plants (1.8 terajoules (TJs)) and natural gas power plants (.420 TJ) (resource 2). The use of nuclear power plants would drastically decrease the greenhouse gases produced from power production. Nuclear power plants produce little to no greenhouse gases. Although, the drawback of nuclear power plants is that they produce nuclear waste that needs to be buried. However, nuclear waste can be reused for energy production because the uranium that initially goes into energy production gets converted into plutonium, which can then be recycled and used as an energy source. The only problem with this solution there are not many nuclear power plants built in the US and they would have to be built. Nuclear power plants take about 5-10 years to be built. The other problem is that people are afraid of nuclear power and the transportation of radioactive elements.
Small Battery-Powered Drill:
The power generation and supply for building and running the battery-powered screwdrivers is another issue that could be corrected through the use of nuclear power. The use of nuclear power would also reduce the greenhouse emissions from running coal plants. The small battery powered drill requires energy not only to manufacture the product, but also to power the use of the product. 165 million tons of CO2 and 2 million tons of CFCs are released into the atmosphere when 1 million dollars worth of battery-powered drills are manufactured. Then there is also more CO2 and CFCs released when the product is being used (resource 3). 1.57 TJs are produced by coal plants and .351 TJ are produced by natural gas power plants. If nuclear power plants replaced the coal and natural gas plants then the greenhouse gases produced by manufacturing this product would be eliminated.
Failure Modes Effects Analysis (FMEA)
| Item or Function | Failure Mode | Effects of Failure | S | Causes of Failure | O | Design Controls | D | RPN | Recommended Actions | Responsibility | Comments | |
|---|---|---|---|---|---|---|---|---|---|---|---|---|
| Teeth in Ring Gear | Gear Teeth Sheared | - Gear teeth get put under too much shear stress | 7 | - Brittle Paint - Rapid firing - Sharp edges | 4 | - Test in various conditions on: - rapid rate of fire - cold weather - hot/humid weather - loose barrel | 1 | 32 | - Check smoothness of barrel and body to barrel transition - Check barrel and paintball fit - Tighten fit between bolt and body - Make appropriate adjustments | Design engineers and manufacturing quality assurance | Breaking paintballs is inevitable and probably already minimized for this particular design | |
| Switch Lever | Switch Lever Sheared | - Swith lever gets put under too much shear stress | 7 | - Brittle Paint - Rapid firing - Sharp edges | 4 | - Test in various conditions on: - rapid rate of fire - cold weather - hot/humid weather - loose barrel | 1 | 32 | - Check smoothness of barrel and body to barrel transition - Check barrel and paintball fit - Tighten fit between bolt and body - Make appropriate adjustments | Design engineers and manufacturing quality assurance | Breaking paintballs is inevitable and probably already minimized for this particular design | |
| Pawls | Pawls Sheared | - Pawls get put under too much shear stress | 7 | - Brittle Paint - Rapid firing - Sharp edges | 4 | - Test in various conditions on: - rapid rate of fire - cold weather - hot/humid weather - loose barrel | 1 | 32 | - Check smoothness of barrel and body to barrel transition - Check barrel and paintball fit - Tighten fit between bolt and body - Make appropriate adjustments | Design engineers and manufacturing quality assurance | Breaking paintballs is inevitable and probably already minimized for this particular design |
Ratcheting Screwdriver Parts List
| Part # | Part name | QTY | Function | Wt.(kg.) | Material* | Process* | Photo |
|---|---|---|---|---|---|---|---|
| 001 | Screwdriver Shaft | 1 | Holds the screwdriver bits in its tip, while the base is connected to the handle. | NA | Aluminum | extruding milling | 
|
| 002 | Screwdriver Handle | 1 | Allows the user to grasp the screwdriver for use. | NA | Rubber/Plastic | injection molding | 
|
| 003 | Ring Gear/Ratchet Housing | 1 | Rotates opposite the engaged pawls, and allows for the ratcheting of the screwdriver. | NA | Aluminum | turning milling | 
|
| 004 | Pawl | 2 | Engages the ring gear to stop rotation in one direction, allowing rotation in the opposite direction, thereby allowing ratcheting. both pawls can also be engaged to sllow no ratcheting such that the screwdriver can be used as a regular/static screwdriver. | NA | Steel | forging grinding | 
|
| 005 | Pawl Spring | 2 | The spring pushed the back end of the pawl, forcing it to engage the ring gear. | NA | Aluminum | drawing bending | 
|
| 006 | Ball Bearing | 1 | Allows free left and right motion of the button. | NA | Aluminum | hot rolling cold rolling | [] |
| 007 | Body Screw | 1 | Attaches the screwdriver shaft to the screwdriver handle. | NA | Steel | threading | [] |
| 008 | Button | 1 | Can be switched left, right, or middle, allowing left or right ratcheting or stopping motion. | NA | Aluminum | injection molding | 
|
| 009 | Button spring | 1 | Pushes the ball bearing against the rear of the button. | NA | Aluminum | drawing bending | [] |
Portable Electric Screwdriver/Drill Parts List
| Part # | Part name | QTY | Function | Wt.(kg.) | Material* | Process* | Photo |
|---|---|---|---|---|---|---|---|
| 001 | Screwdriver/Drill Housing | 1 | Houses the internal parts of the drill | NA | Plastic | injection molding | 
|
| 002 | Drill Cover | 1 | Covers the nose of the drill | NA | Plastic | injection molding | 
|
| 003 | Drill Motor | 1 | Rotates the sun gear, draws current through the wires at the base of the motor to determine the direction and speed of rotation | NA | Plastic/Metals | 
| |
| 004 | Rechargeable Battery Pack | 1 | The power source for the drill, draws power from the battery chargin power input and stores the voltage. | NA | Metal, Plastic, and Chemicals | 
| |
| 005 | Lock Ring | 1 | Clamps the drill housing to the drill shaft | NA | Metal | stamping | 
|
| 006 | Gear Housing | 1 | Acts as a cylindrical ring gear that houses the planetary gear system. | NA | Copper | 
| |
| 007 | Reset Button | 1 | A button on the external part of the body that will reset the drill when depressed. | NA | Plastic | 
| |
| 008 | Battery Charging Power Input | 1 | Draws voltage from the power cord and send it to the rechargeable battery pack where it is stored. | NA | Plastic/Metal | 
| |
| 009 | Housing Screws | 2x3 | Holds the plastic housing together | NA | Steel | threading | 
|
| 010 | Trigger | 1 | Switches the direction of the drills rotating output. | NA | Plastic | 
| |
| 011 | Washer | 1 | Keeps the drill motor and gear housing tight together. | NA | Copper | stamping | 
|
| 012 | Planetary Gears | 1 | Gears within the gear housing that rotate around the sun gear, they increase the torque by reducing the speed. | NA | Copper | 
| |
| 013 | Sun Gear | 1 | Transfers the rotational output of the motor to the planetary gears. | NA | Copper | 
| |
| 014 | Intermediate Gears | 1 | Keeps smooth rotation between planetary gears and the gear housing. | NA | Copper | 
| |
| 015 | Drill Shaft | 1 | Attached to the output of the gear housing and extends through the drill cover. Holds the drill bit in its external end of the shaft. | NA | Steel | extruding milling | 
|
| 016 | Lights | 1 | Red, yellow, and green lights that tell when the drill is charged, charging, and needs charging. | NA | Plastic/Metal | 
| |
| 017 | Wiring | 1 | Basic red and black wires running current between electrical parts of the drill | NA | Plastic/Copper | drawing | 
|
| 018 | Switch Box | 1 | Switches the direction of voltage to the motor depending on the direction of triggers depression. | NA | Plastic/Copper | 
|
Mechanical Analysis
Analysis of the Gear Ratio for the Electric Screwdriver:
The electric motor within the electric screwdriver produces a very high rotational speed, but very little torque. However, the customer needs a device capable of producing a relatively high amount of torque, but not necessarily at such a high speed. Thus, the electric motor is geared down before it is attached to the bit. After the dissection of the drill, we found that a planetary gear system was used to accomplish this. In this gear train, the annulus was held stationary within a housing. The sun gear was used for the input, and the output was therefore the planet carrier. This planet carrier in turn was connected to the sun gear for the next level. In total there were three levels of gears, each of which reduced the torque by a factor of 1/(1+A/S), where A is the number of teeth on the annulus, and S is the number of teeth on the sun gear. With three levels, the total gear ratio is 1/(1+A/S)^3.
References
1.http://www.eiolca.net/cgi-bin/multimatrix/display.pl?hybrid=no&key=9232578260&value=3425720201&selectsect=332212&selectvect=gwp&incdemand=1&demandmult=1&top=10&DefSort=1&newmatrix=US491IDOC1997 2.http://www.eiolca.net/cgi-bin/multimatrix/display.pl?hybrid=no&key=9232578260&value=3425720201&selectsect=332212&selectvect=fuels&incdemand=1&demandmult=1&top=10&DefSort=1&newmatrix=US491IDOC1997 3.http://www.eiolca.net/cgi-bin/multimatrix/display.pl?hybrid=no&key=5962855190&value=4772278266&selectsect=333991&selectvect=gwp&incdemand=1&demandmult=1&top=5&DefSort=1&newmatrix=US491IDOC1997 4.http://www.eiolca.net/cgi-bin/multimatrix/display.pl?hybrid=no&key=5962855190&value=4772278266&selectsect=333991&selectvect=fuels&incdemand=1&demandmult=1&top=5&DefSort=1&newmatrix=US491IDOC1997 5.http://en.wikipedia.org/wiki/Epicyclic_gearing
