Cordless drill
From DDL Wiki
(→Function/Purpose:) |
(→Inputs/Outputs:) |
||
| Line 113: | Line 113: | ||
==Inputs/Outputs:== | ==Inputs/Outputs:== | ||
| - | + | The physical input to the drill is an axial force to the trigger which is normally delivered by the index finger, with the shaft of the drill in the palm of ones hand. When the trigger is squeezed, a potentiometer measures the depth the trigger has been depressed and allows a proportional amount of voltage to the motor. The motor spins at very high speeds, so to translate this speed to power, the shaft of the motor is connected to a planetary gear train which spins the chuck assembly. If the clutch is set to forward, the chuck spins clockwise, if the clutch is in the middle, the trigger would not have been able to depress, and if the clutch is set to reverse, the chuck would spin counter clockwise. | |
| - | + | When turning, there will normally be some material, whether a screw or board, etc. that resists the drill’s rotation. To counter this, a torque must be input by the operator’s hand and wrist to keep the drill steady. Most cordless drill operations also require an axial force pushing the bit forward into the material it is perpendicular to. | |
| - | + | ||
| - | + | ||
| - | + | ||
| - | + | ||
==Use and Basic operation:== | ==Use and Basic operation:== | ||
Revision as of 06:44, 7 February 2007
Contents |
Cordless Drill
Group II
Ming Huo
Scott Miller
Vishesh Nandedkar
Mark Rockwell
Product Dissection
Before doing anything else, we dissected our drill to take a look at each part up close and understand how the drill works from a technical standpoint.
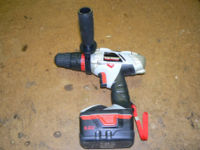
The cordless drill, pre-dissection is pictured above.
Parts List
Function/Purpose:
The purpose of the cordless drill is to spin “bits”. “Bits” are the tools that go in the end of the drill and they come in many different shapes, to accommodate driving, drilling, mixing or cutting. Things that can be driven include screws with Philips heads, flat Heads or hex shaped heads. For drilling, drill bits come in many sizes, from small fractions of an inch up to about an inch in diameter. The material of the drill bits varies as well, depending on the surface being drilled in to. There are also attachments for mixing, such as egg beaters or whisks. For cutting, one could even insert small cutting wheels, though in general, the main intended use for cordless drills, are drilling and driving. The cordless drill is meant to be portable and small enough to get in tight places, making it suited for the home or automobile. It has no harmful exhaust so it may be used indoors or outdoors. We are not sure if it may be used under water, but assume it is not ever meant to be. Aside from making holes, it is also used to bind materials together with screws, or can be used to drill weaker objects such as stripped screws or broken locks. It is often used for installation of hardware, or removal of covers or anything really which is secured in place with screws. It can even be used to unscrew completely stripped screws, by tightening the chuck around the screw head and putting the drill in reverse.
Inputs/Outputs:
The physical input to the drill is an axial force to the trigger which is normally delivered by the index finger, with the shaft of the drill in the palm of ones hand. When the trigger is squeezed, a potentiometer measures the depth the trigger has been depressed and allows a proportional amount of voltage to the motor. The motor spins at very high speeds, so to translate this speed to power, the shaft of the motor is connected to a planetary gear train which spins the chuck assembly. If the clutch is set to forward, the chuck spins clockwise, if the clutch is in the middle, the trigger would not have been able to depress, and if the clutch is set to reverse, the chuck would spin counter clockwise. When turning, there will normally be some material, whether a screw or board, etc. that resists the drill’s rotation. To counter this, a torque must be input by the operator’s hand and wrist to keep the drill steady. Most cordless drill operations also require an axial force pushing the bit forward into the material it is perpendicular to.
Use and Basic operation:
(scenario where putting screw in wall)
- Charge Battery
- Remove battery from charger
- Slide battery into drill
- Select bit/tool
- Loosen Chuck
- insert bit and tighten chuck
- select "cut-off" torque
- engage drive or gear
- Place head of screw on bit.
- Hold head of screw to bit (with hand).
- Place Tip of screw to desired object
- Partially squeeze trigger to provide low rotation-speed at first. All this while pushing axially.
- once screw's thread catch the wood, pull trigger to increase torque/omega.
- consistantly adjust to make sure bit is in line with screw.
- Let go of trigger when screw at desired location.
Different Users / Use Scenarios
- weak wrist/grip
- shaky hands
- can't push hard enough
- tightening Chuck
- Actual drilling into material
- Dead battery
- Improper/Hard surface
- Screw stripping
- Screw alignment
- Wrong bits.
- Aligning bit correctly within chuck
- Poor eyesight
- Poor hand-eye cooridnation
- Over-torquing (too soft a surface)
- Poor lighting
- no hands
- tight areas/corners (awkward shape)
- Hard time hearing maybe can't hear what's happening
- screw stripping
- overtorqueing
- not strong enought to switch between F/N/R


