Snowboard
From DDL Wiki
Contents |
Executive Summary
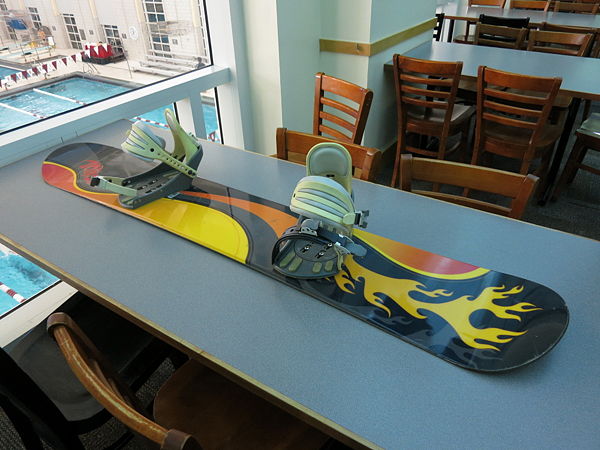
Modern day snowboards are precision devices, designed to suit a particular riding style or facilitate better stability and control. After purchase and disassembly of a Rossignol snowboard and bindings, our team analyzed the product design in terms of manufacturability, ease of assembly, failure modes, and environmental impact in order to determine possible areas for innovation.
Research into the manufacturing process of a snowboard revealed that while the individual components of a binding may be optimized for mass production and assembly, the process of making the actual board is still essentially manual; layers of plastic, fiberglass, and resin are layered around a wood core and the entire assembly is then inserted into a press to harden into the desired shape. By splitting the board into two sections, this process could be sped up by constructing the two halves of the board concurrently. From the environmental analysis it was determined that most greenhouse gas emissions associated with snowboard use are incurred by the loss in fuel economy when the board is transported on a rack outside the vehicle. Splitting the board in two would allow consumers to more easily fit snowboards into compact vehicles, thereby decreasing the emissions associated with their use.
The analysis of an existing snowboard has identified a major design improvement that will be investigated in subsequent analyses to determine whether consumers have a use for a foldable snowboard and what sort of structural or frequency response effects are introduced by splitting the board in half.
This is an edit to demonstrate the latency of the wiki posting system.
Stakeholders
We have identified four major stakeholders in the life cycle of the competitor's product: the user, the retailer, the manufacturer and the shipping company. Below is a list of the needs of each stakeholder concerning the product.
Users
The user is the main person to use the product, therefore his needs are the ones that should be first taken into consideration when redesigning the competitor's product.
- Low price
- Light with sufficient rigidity and flexibility
- Durable
- Board should have sharp edges but remain safe to carry
- Adjustability and strength of bindings
- Ergonomics of bindings: they should be easy to strap on and release
- Appearance, branding
Retailers
The needs of the retailer are centered around making profit by selling the product, and facilitating the after-sales service.
- Profitability
- Appearance, branding, appeal
- Easy to store: small weight and dimensions
- Serviceability: standardization of parts
Manufacturers
The needs of the manufacturers are aimed at easy and cheap manufacturability.
- Simple geometries
- Limited number of parts
- Cheap materials that are easy to work with
- Cheap manufacturing processes
- No toxic materials
- Easy to store: small weight and dimensions
Shipping Companies
The shipping companies want an easy to carry product.
- Package should be light and compact
- Durable: resistance to vibrations and shock
- Replacement parts must be easily shippable
Use Study
Main Steps
The main steps in using the product on a typical snowboarding ride are listed below.
- Travel to mountain and ski resort
- Purchase ticket
- Put on boots, hat, gloves
- Strap front boot into binding
- Take ski lift and get to the top of mountain
- Strap rear boot into binding
- Go down the slope traversing the fall line
- Unstrap rear foot and take ski lift again
The snowboard is comprised of two main parts: the board and the bindings. We analyse how to use each of them separately.
Bindings
The bindings attach the boots of the snowboarder to the board. They enable the user to control the board by using his weight and exerting forces on his legs.
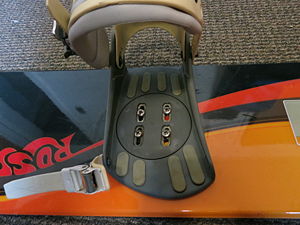
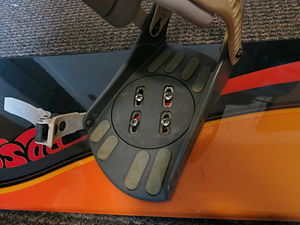
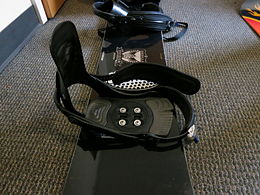
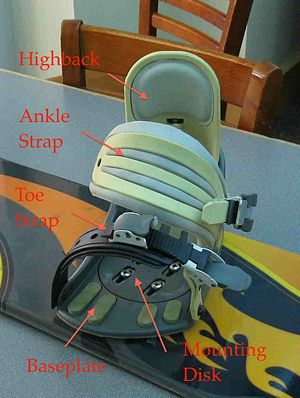
Before fitting the boots into the bindings, the user can adjust the angle that the bindings makes with the board. By releasing the four screws that secure the mounting disk to the board, the mounting disk can be pulled off, allowing the baseplate to rotate. Once the user has set the baseplate to the desired angle, he can tighten the screws that secure the mounting disk to the board. The mounting disk itself will secure the base plate. The user can also adjust the space that separate both bindings by securing the mounting disk to the board through different rows of holes.
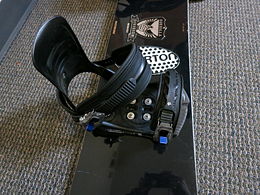
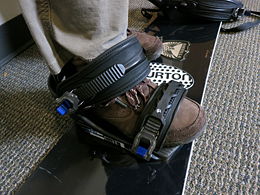
Each boot is held into place by two straps and a highback. The toe strap secures the front part of the boot to the baseplate, while the ankle strap tightens the upper part of the boot against the highback. The user begins with adjusting the desired angle for the highback (the angle will affect the style of riding) by releasing the angle limiter lever, setting it to the desired position and tightening it again. Then, he pulls the levers of the buckles to release both toe and ankle straps so that he can insert his snowboard boot into the binding. Then, he tightens both straps to secure the boot into the binding.
Initial use study reports show that the bindings are not convenient to undo and fasten again every time the rider has to take the ski lift, especially when wearing snow gloves. Also, the rider has to make sure the bindings have his desired angular and lateral positions before leaving home, because he needs a screwdriver to change these.
Board
The board enables the user to slide straight on the snow, but it also enables the user to make turns. In order to make a turn, the user first has to bend the board using his legs. Then, using his center of gravity, he has to tilt the board so that one of edges of the board goes into the snow and cuts the ice. Because the board is bent, the edge is rounded and this will make the snowboard turn. The user can turn either on the front or rear edge. By switching between turning and riding straight, the user can then go down the slope in slalom.
Use study reports don't complain about the riding of the snowboard in itself, but rather focus on the transportation of the snowboard, that is not very handy due to its size.
Mechanical Function
Bindings
The baseplate is the frame of the binding. It is indirectly tightened to the board by the mounting disk, which is secured to the board by four screws. A rubber damper, placed in between the baseplate and the board, filters the vibrations coming from the board.
The boots are fixed to the bindings by the highback and two straps. An angle limiter enables the user to change the angular position of the highback.
The ankle strap tightens the upper part of the boot against the highback. It consists of the ankle ladder strap, the ankle strap, the ankle strap pad and the ankle buckle. The ladder strap engages with the buckle to tighten the strap against the ankle portion of the boot. A tightening lever on the buckle enables the user to tighten the strap, while the loosening lever enables the user to loosen the strap.
The toe strap tightens the lower part of the boot against the base. It consists of the toe outer strap, the toe outer buckle, the toe ladder strap, the toe inner buckle and the toe inner strap. With the outer buckle in loose position, the ladder strap engages with the inner buckle to slightly tighten the inner strap against the toe portion of the boot. Then, closing the outer buckle will firmly tighten the whole toe strap against the boot.
Board
The board has to bend and twist to accommodate turning, as seen in the use study section. The steel edges have to be sharp so that the board can grip ice and snow. Finally, the board absorbs and damps the vibrations coming from the friction between the bottom surface and the snow.
Product Parts
Exploded Assembly
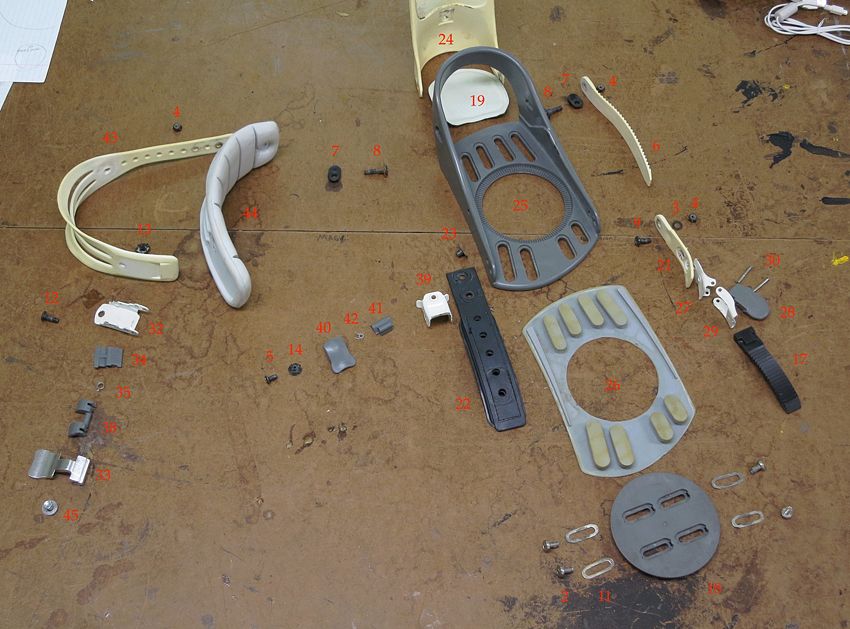
Here we show the exploded assembly that results from the dissection of one binding. The board itself and the other binding are not shown on the picture.
Bill of Materials
The bindings make up the most part of the dissection of the snowboard. The dissection has resulted in more parts than one would expect of a binding. Below is a table listing all the individual components that constitute the snowboard.
Design for Manufacture and Assembly
Design for Manufacture
Snowboard manufacture is a manual process. Plastic, fiberglass, and wood are layered successively to form a durable board with the necessary mechanical and dynamic properties. Additionally a steel edge is affixed to encircle the board edge entirely to facilitate grip on snow and ice. The layers and edge are bonded with an epoxy resin, which is cured in a press under heat and pressure.
In some ways, the board is designed for ease of manufacture. The manufacturing process takes advantage of plastic as an ideal surface for printed graphics. Wooden or foam core layers are easy to work with.
Otherwise, however, the layering to form the composite board and handling of resins is cumbersome and potentially hazardous. The manufacturing process could be expedited by automating the sizing, printing, layering, cutting, and bonding of the various layers.
In addition, binding manufacture was considered. Multiple sets of functionality are provided for by parts in slightly different configurations, which decreases replaceablilty and standardization. For example, the rivets and screws are nearly identical throughout but could be standardized completely. Furthermore the buckle and strap assemblies for toes and ankles are similar but could also be made identical. Finally, the bindings have an asymmetrical footprint contoured to accommodate a left and a right foot. This may be optimizeable, since the binding can be made to securely hold a symmetrically shaped boot.
Design for Assembly
There is no post-manufacture assembly of the snowboard, as it is one piece.
The bindings are assembled, consist of several sub assemlbies, and total 44 parts each. Subassemblies for the toe and ankle buckles are similar, but could be made identical. The screws and rivets used to fix the straps and buckles to the binding could also be standardized. Bindings come in pairs, but the foot prints of the left and right are not symmetrical. This may not be necessary and adversly affects replaceability.
DFMA Conclusions
- A snowboard is made from composite materials, which are difficult and cumbersome to work with
- The snowboard manufacturing process is manual, labor intensive, and may be completely overhaulable
- Binding components can be standardized to facilitate assembly and replacement
Failure Modes and Effects Analysis
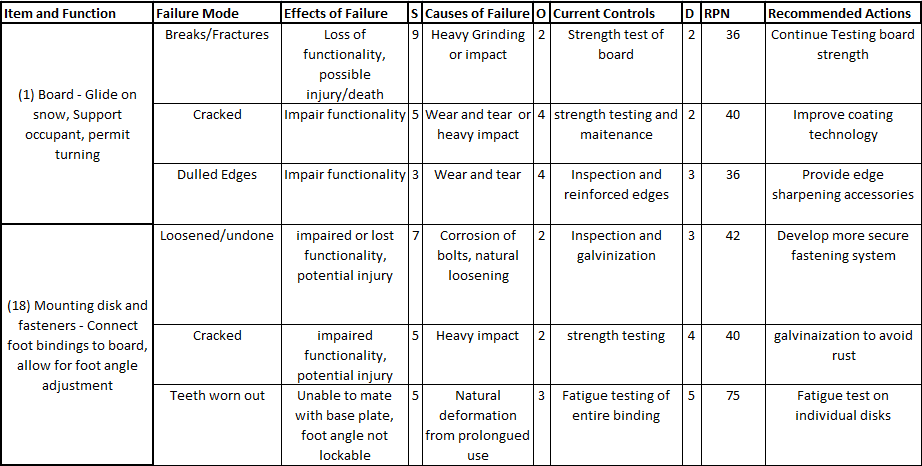
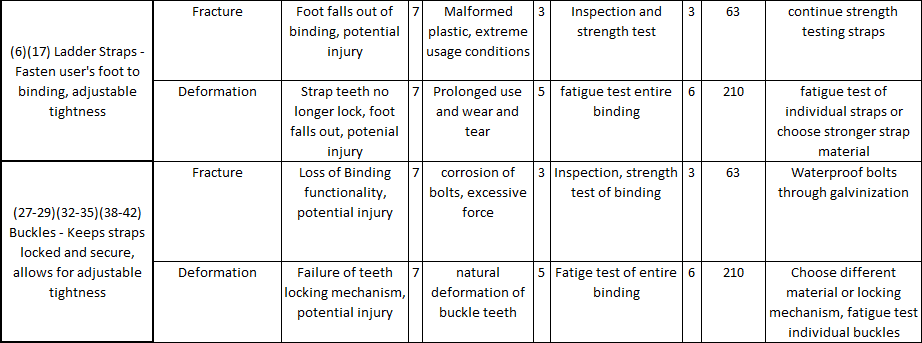
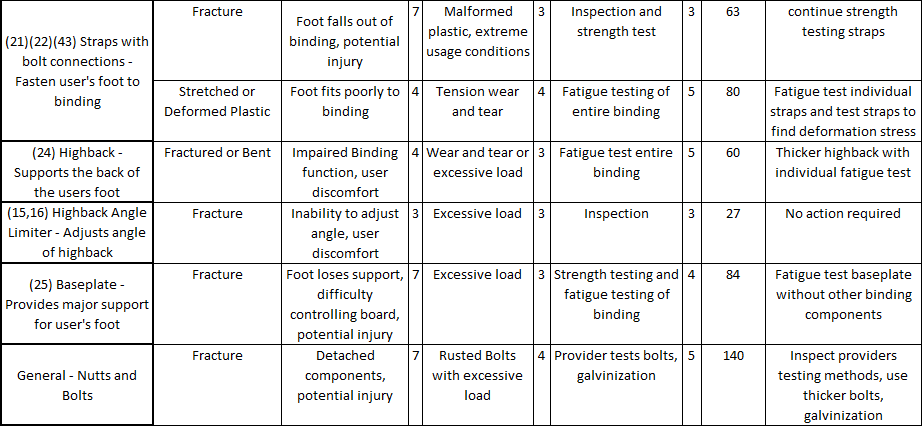
Failure mode analysis is a useful tool for determining design weaknesses. It weighs the severity (S) of the damage from a potential failure with its likelihood of occurrence (O) and ease of detection (D). It then comes up with a risk priority number (RPN) equal to S*O*D.
Snowboarding is inherently dangerous and failure of any component during typical high speed usage could lead to injury. Therefore the severity of damage for each of our failure modes is very high. However, the likelihood of occurrence is typically low, and the problems are typically detectable. Extensive testing is done on the board itself to verify board strength. A core test is done by freezing the board in a temperature controlled deep freeze to replicate extreme conditions, and then subjecting the board to a series of flex tests.
While the most dangerous failure mode is fraction of the board, the more concerning failure mode is deformation or fracture of straps and connections in the bindings. Fatigue testing is done to the completed and assembled bindings. A possible improvement is to introduce fatigue testing on each of the binding’s components individually. It may be productive to redesign the strap fastening system or strengthen the material currently used in the straps; however, the current design is generally safe and does not require improvement.
Design for Environment
Use Phase
A snowboard has very low greenhouse gas emissions in use. The only emissions associated with use are the additional emissions from transport, which we consider negligable if transported inside a vehicle, but could be significant if transported externally, as for example on the roof of a car which would add drag. To assess the design for environment we considered that snowboards are transported in a ski rack on a car and then the added CO2 of drag and the CO2 from manufacturing was estimated.
The emissions caused by the added drag can be estimated by considering a increase in fuel consumption of 5% when using a ski rack [1]. When estimating an average driving distance to snowboard as 200 miles, a car with 20 miles/gallon, 5 trips/year, a 10 year life span and an average of 3 snowboards in the rack, the amount of gas needed to compensate for the ski rack can be estimated to 8.3 gallons. Considering 8.9 kg CO2 per gallon of gas [2] the total CO2 emissions from the use of a snowboard is approximately 75 kg. For such a rough estimate it is natural to round it to the nearest order of magnitude of 0.1t CO2.
Production Stage
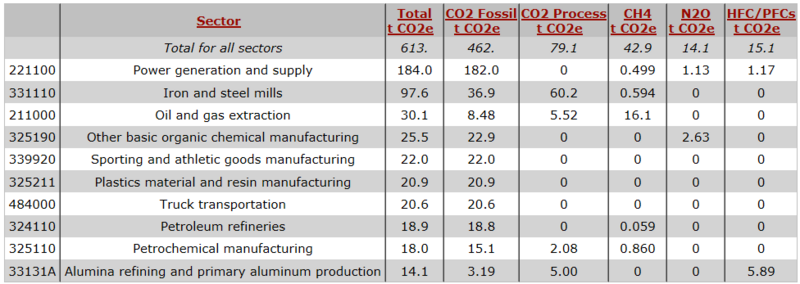
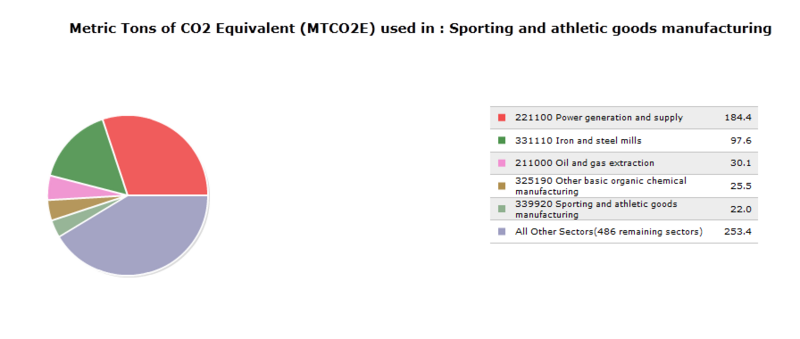
To estimate the amount of CO2 emissions from manufacturing we used the Economic Input-Output Life Cycle Assessment (EIO-LCA) method [3] to create the table of CO2 emissions below. The table represents the CO2 emission from all the economic sectors involved in producing products of a 1 million $ value from the sporting and athletic goods manufacturing sector. This method gives a total of manufacturing emissions as 0.25t CO2 when considering an average price of 400$ for a snowboard.
However the method is very unprecise in our case as snowboards only represents a small fraction of the sporting and athletic goods manufacturing sector, so the value found represents the average emissions from all sports equipment which could vary enormously from one product to another.
End of Life
At the end of the use cycle the snowboard would most likely end up in a landfill, as it contains a mixture of wood, plastic, metal,resin leather and foam, which would be extremely expensive and inefficient to take apart and recycle. Instead of attempting to make a recycleable snowboard it would be more effective to attempt to increase the use cycle. This could be done by improving the surface quality, having replaceable edges or making it easier to change the color and designs on the board to make it look up to date.
DFE Conclusions
The total estimated CO2 emissions from the board are 0.35t. The conclusions are that if a tax of 40$ per ton CO2 is implemented, the snowboard would cost 14$ more (a 3.5% increase in price). A consumer would probably not be affected by this increase in price, however if the cost is paid by the manufacturers it would be significant as they would lose 14$ times number of boards sold, possibly losing millions. If this is the case manufacturers would likely look for ways in which to reduce this cost. Transporting the snowboard during the use cycle accounts for around 30% of this CO2 cost and reducing this is what our group identifies as the main area in which the snowboards carbon footprint can be improved.
Team Roles
Saviz Mowlavi - Team Leader
Evan Walden - FMEA Lead
Philip Brown - DFMA Lead
Erik Ringvold - DFE Lead
Christopher Tomaszewski
References
[1] http://editorial.autos.msn.com/article.aspx?cp-documentid=435406
[2] http://www.eia.gov/oiaf/1605/coefficients.html
[3] http://www.eiolca.net/
