Removable windshield scraper blade
From DDL Wiki
(→Testing of Final Prototype) |
(→QFD) |
||
| Line 192: | Line 192: | ||
- A QFD to show (at minimum) the quantifiable engineering targets you have set for the design, relationships between engineering specs and stakeholder needs, and benchmarking of competing products. As always, explain your conclusions, such as what strengths your design has over competitor products and who is likely to buy it. | - A QFD to show (at minimum) the quantifiable engineering targets you have set for the design, relationships between engineering specs and stakeholder needs, and benchmarking of competing products. As always, explain your conclusions, such as what strengths your design has over competitor products and who is likely to buy it. | ||
| - | + | [[Image: house of quality.jpg]] | |
== Final Prototype == | == Final Prototype == | ||
Revision as of 01:09, 9 December 2007
Final Report DUE DEC 7th* - ONE PER TEAM
- Will be accepted up to Dec 11th < midnight
SUBMIT AS WORD, PDF, OR WIKI PAGE
In your final report, you are looking to 1) provide evidence and make a case to support the need for your new design; 2) provide documentation necessary to fully describe and define the detailed design for production; and 3) use engineering analysis and your prototype to demonstrate feasibility of the design. Each team should document any information needed to accomplish the above objectives. To help you avoid forgetting anything major, a minimum requirements checklist will include:
Contents |
Executive Summary
(1-page max)
- Appropriate background on the project. The following document contains a report on a new product design. The purpose of this report is to analyze a windshield wiper system and come up with an improvement to this product. More specifically, we purchased the windshield wiper system of a ’96 Corsica and designed our product around that model. Windshield wipers are mainly used by customers for removing precipitation from the windshield so as to increase driving visibility and safety. Due to the fact that the primary purpose of this product is safety, it is important for the product to be reliable and functional. Ease of use is also a high priority because of quick-think situations that customers may find themselves in. Lesser in importance are maintainability and cost. In the initial stages of our analysis we took apart our product to examine the way it works, get a part count, look closely at the DFMA aspects of it, and determine what could be improved.
OLD STUFF
This proposal examines the windshield wiper system in a '96 Corsica, in hopes of either improving the design or manufacturing process. For the time being we have focused on product dissection and analysis. Our product, windshield wipers, are mainly used by customers for removing precipitation from the windshield so as to increase driving visibility and safety. Every automobile on the road has a windshield wiper system to be used for this purpose. Due to the fact that the main purpose of this product is safety, it is highly important for the product to be reliable and functional. Ease of use is also a high priority because of fast-acting scenarios that customers may find themselves in. Lower in importance are maintainability and cost, so that people are encouraged and can maintain their systems to a usable level. The design for assembly and for manufacturing seems to be well thought out. There is a relatively low part count and very few fasteners. None of the parts are that intricate and all are big enough clamped down and easily manipulated while being small enough that they are not heavy or unwieldy.
Based on traditional FMEA the greatest risk of failure is in the hose, followed by the thermal mount. A scenario-based FMEA was done on the hose and thermal mount and the expected cost of the thermal mount greatly exceeded the cost of a failure in the hose. Thus, it is actually more important that the thermal mount be well designed than the hose, even though the hose has a higher expected failure. The recommended action for the hose would be to increase the wall thickness. The recommended action for the thermal mount is the safe-guard the rubber against corrosion.
For an environmental standpoint, the production of the windshield wiper assembly is most harmful in the production of power for manufacture of steel parts. This is evidenced by our analysis using EIO-LCA software that claims that most toxic waste is emitted during “motor vehicle parts manufacture.” In our analysis we also take End of Life into account and choose how each part will be reused, recycled, or disposed of in a landfill. From this analysis, most of the parts on the current assembly will not be reused thereby harming the environment.
This product seems to have already gone through DFMA considerations, based on analysis during the dissection of it. Most parts are either cast or injection molded, which is a good process for high-volume parts. It may be better if the parts could be more standardized. There are very few parts with the same exact shape, though it seems like it is possible to accomplish that. Assembly of the system is time consuming because of all the press fit parts. Also, if there is error in press-fitting those parts are essentially rendered useless. However, for durability purposes this is a good method of keeping components together.
Our decision began with simultaneous brainstorming and market research. We conducted several interviews and based on those and our own experiences we created a list of problems people have with the current system. We then had a few brainstorming sessions, ending up with a list of 97 ideas for design changes and improvements. The raw market research and list of ideas can be found here: http://ddl.me.cmu.edu/ddwiki/index.php/Windshield_wiper_ideas . The most common problems we found were that leaves were getting stuck under or in the blades, the blades were ineffective in the winter at cleaning ice off the windshield, people wanted a more environmentally friendly disposal solution, and that the blades should be longer lasting.
To address these concerns we came up with many ideas and narrowed them down to the top four. The first is heated blades, in which the blades of the wipers would be heated for easier snow and ice removal. The second is easily removable blades, in which the rubber part of the blade is made to snap into the wiper so that exchanging them is easier and more environmentally friendly. The third is a compressed air system that would eliminate blades all together and would be very good at removing leaves and other loose debris from the windshield. The final is a multiple-blade system that would incorporate both a rubber wiper for rain and a hard plastic scraper for removing snow and ice.
We used a Pugh chart to analyse each idea and found that we could easily remove the compressed air system as a possible solution because it ended up with a net score of -4. The top scorer was the easily removable blades, which ended up with a net score of 8. We decided however, to go with a multiple blade system as our final product because it was a more interesting and innovative solution and it still netted a score of 4. Since heated blades, with a score of 3, and easily removable blades both scored positively and are more minor design problems we will be looking into incorporating one or both with the multiple blade idea.
The following document contains a report on a new product design. The purpose of this report is to analyze a windshield wiper system and come up with an improvement to this product. More specifically, we purchased the windshield wiper system of a ’96 Corsica and designed our product around that model.
In the initial stages of our analysis we took apart our product
Market Research
- A clear statement of the opportunity you have identified, and documentation of market research to support the need.
The need that we found was for people to have a way to get ice off there windshield with out having to be outside scrapping it. We found that there where no other products designed around this purpose. This is what we saw as our opportunity to fill a niche that was clearly not being meet. We felt that if an effective deign could be made people would buy the product because of the near universal distance for standing out side in the cold while scrapping ice off your windshield.
When trying to decided if the windshield scrapper idea that we came up with would be something that people would actually want to buy we decided to sample the people we knew to get there reaction to design idea. We each contacted 5-10 and between the four of us only one person didn’t like the idea. There were however several people that had reservation mostly having to do with how easy it would be to attach and how quickly it would get ride of the ice.
When we were trying to decided on what kind of attachment we should make between the wipers and our blade we thought it would be time to do some more market research on what most people’s windshield wiper blades look like. What the problem boiled down to was did a great enough percentage of people’s wiper blades have holes on top and a recess that we could justify the use of a permanent attachment part that utilized these holes. To get a good cross section of what our target demographic (having plenty of disposable income and like gadgets) had on there car we started out in CMU’s parking lot and surveyed the cars, it also couldn’t hurt that CMU is ranked very high for out of shape campuses. We found rather favorable results most cars windshield wipers had holes in there wipers. Then we decided to expand our sample to include cars parked in the Pitt university area and found similar results. In the end we sampled more then a hundred cars and found when all was tallied up the result was 1 to 13 in favor of holes.
Design
Bill of Material
| Part | Quanity | Material | Function of Type | Manufacturing Process | Drawing Number or Catalog number |
|---|---|---|---|---|---|
| Blade | 1 | ABS Plastic | To scrape the windshield and push snow off | Injection Molding | 1 |
| Chassis | 1 | ABS Plastic | this is the part that everything connects to it has both knobs and the blade attached to it | Injection Molding | 2 |
| Knob | 1 | ABS Plastic | the handle and turning piece used to attach chassie/blade to mount | Injection Molding | 3 |
| Mount | 2 | 6061 Aluminum | The perminant piece that allows for easy attachment | Injection Molding | 4 |
| Tab | 2 | ABS Plastic | this is attached to the knob and is used to slide in and hold to the mount | Injection Molding | 5 |
| Block | 2 | 6061 Aluminum | it is placed inside the wiper and is used to screw into, holding the mount to the wiper | Stamping | 6 |
| Spring | 2 | Piano Wire | is used to provide additional friction between tab and mount by increasing normal force | puchased | C14-035-040 |
| Screws | 6 | Stainless Steal | 6-32 X .25 | puchased | done by quots |
Links to PDFs of all the drawings for our product:
[Assembly Drawing]
[Blade Drawing]
[Chassis Drawing]
[Knob Drawing]
[Mount Drawing]
[Block Drawing]
[Tab Drawing]
Pricing
ABS is a thermoplastic and lends its self to processes such as injection molding very well, a quick round up of its properties is at the end of this section.
Lustran ABS 433 comes in black high gloss which should give our design a nice slick look and is one of the low costing forms of ABS. It is also commonly used in injection molding application. ABS 433 is used for automotive applications and other consumer applications. The supply of that we would use is LanXess, there is a PDF in the reference section that has the technical data for using this plastic in injection molding. It is also important to note the environmental impact of Lustran ABS 433 which meets all enviormental guidelines for both the US and the EU. LanXess offers documentation to show that it meets the several guidelines such as the RoHS-Directive.
Our initial run will probably be smaller until we have design fully perfected because of this we will probably start out with a cheaper aluminum mold. This will cost much less then a steel mold and we will be able to make them quickly with a CNC in this way we can go though a few generations before a steel mold is constructed. The most complex part is the chassis and it is not all that complex so the molds and process should be very low cost. Assuming that we have a total first run of 500,000 and factoring that our aluminum molds will have to replaced a couple of times in the process the costs per part are in the table below these numbers are based on cost estimator software provided by David O. Kazmer, P.E., Ph.D. from University of Massachusetts Lowell. The two aluminum parts are made in two ways one is stamped and the other is injection molded as well. The injection molding part, the mount, was figured on cost using the same software but using a recommended correction factor for the use of a metal verses ABS which came in on the cost of material. The stamped part, the block, was figured based on rates for the cheaper process of stamping but with a higher material cost of aluminum verses ABS.
| in $ | Process Cost | Material Cost | Tooling Cost | # of Cavities | Quantity | Total Cost |
|---|---|---|---|---|---|---|
| Blade | 0.3 | 0.06 | 0.07 | 1 | 1 | 0.44 |
| Chassis | 0.07 | 0.04 | 0.02 | 4 | 1 | 0.12 |
| Knob | 0.58 | 0.07 | 0.01 | 2 | 2 | 1.32 |
| Tab | 0.27 | 0.001 | 0.02 | 1 | 2 | 0.58 |
| Mount | 0.15 | 0.25 | 0.02 | 2 | 2 | 0.84 |
| Block | 0.01 | 0.09 | 0.02 | n/a | 2 | 0.24 |
Which gives a total cost for Manufacturing the parts of: $3.54
The number of cavities for our mold is in the table as well because it as a great impact on the cost of the process. This is because it is much more economical to have more cavities on medium and small parts, like what we have. Some of the parts did not seem as though they could have the extra cavities but the chassis has places for at least four and the knob for at least two.
Purchased Items
The parts that we intend on buying are the springs and the screws. The supply for the springs is W.B. Jones Spring co inc, link in reference, which has a spring that almost exactly meets the requirement figured out by our analysis. The only issue is it has almost double the amount of coils then what we need but they do take custom orders. The plan would be to buy the stock springs and cut them in half until our custom springs are ready. By picking a spring that is already in stock we should be able to get the change we need to these with out that much extra cost and relatively quickly. The screws also should not cost that much we can buy them from a large manufacture and bulk distribute like American Fastener, link in reference. Below is the estimated cost of our purchased parts.
| Cost | Quanity | Total Cost | |
|---|---|---|---|
| Spring | .01 | 2 | 0.02 |
| Screws | 0.005 | 6 | 0.03 |
The total cost for our purchesed items is: $0.05
Bringing our total cost up to: $3.59
Assembly and Indirect Costs
Except for packaging there is no Labor required to assemble one of our snow scrappers because we will follow the Ikea model and let the user do the assembly. This course of action was decided on because the user already has to do some construction, applying the permanent parts on their wiper blades, so the extra steps of screwing on the blade to the chassis and attaching the knobs did not seem like to much or too difficult. To take into account the extra labor of packaging and overhead an extra $0.50 will be factored on. For our selling and distributing expenses we plan on factoring in $0.50 to take in to account the markup we believe the sellers of our product will need we will add $1.50.
Bring the total cost of our product up to $6.09
After looking up what other items that are sold to modify your car and how much wiper blades themselves cost we decided to sell our product for $19.99. All of this gives us a total profit of $13.90. Which is approximately 2¼ times the total cost which is a reasonable amount.
Properties of ABS Plastic
Tensile Strength
5000-7500 psi
Flexural Modulus
270,000-380,000 psi
Impact Strength
3.0-7.5 ft-lb/in notched izod
Maximum Temp.
200 F short duration, 140 F long term
Analysis
- Engineering analysis of the design including 1) an appropriate numerical analysis for your design (required for all) 2) a DFX/FMEA analysis as appropriate for your design, and 3) documentation of any engineering testing performed to support design decisions. In all cases, clearly state assumptions and conclusions.
After the first snowfall of the season, we were able to test our prototype on an actual windshield. The before and after pictures shown above shows that the Plexiglas blade does not scratch the windshield when a large amount of force is applied, and clears away the snow and ice in one back and forth motion. This affirmation told us that Plexiglas is a safe choice for the blade and that our final design would be safe to mount on a windshield wiper and run with the wiper motor.
Video of windshield wiper attempting to clear snow/ice
Video of OUR windshield wiper blade clearing snow/ice off of same car
QFD
- A QFD to show (at minimum) the quantifiable engineering targets you have set for the design, relationships between engineering specs and stakeholder needs, and benchmarking of competing products. As always, explain your conclusions, such as what strengths your design has over competitor products and who is likely to buy it.
Image:House of quality.jpg
Final Prototype
- Documentation of the final prototype including a discussion of what it demonstrates, what was learned from it, and how it differs from the final design.
Testing of Final Prototype
- Documentation of user-testing and user-feedback on your design and prototype.
Testing in snow/ice conditions
User-Feedback
Display
To demonstrate the effectiveness of our wiper attachment for the Design Expo, we created a working model of a windshield wiper. Our display of our final prototype includes the original wiper motor, a single wiper arm, the attachment we designed, and a curved sheet of Plexiglas to represent a windshield.
- picture of complete display*
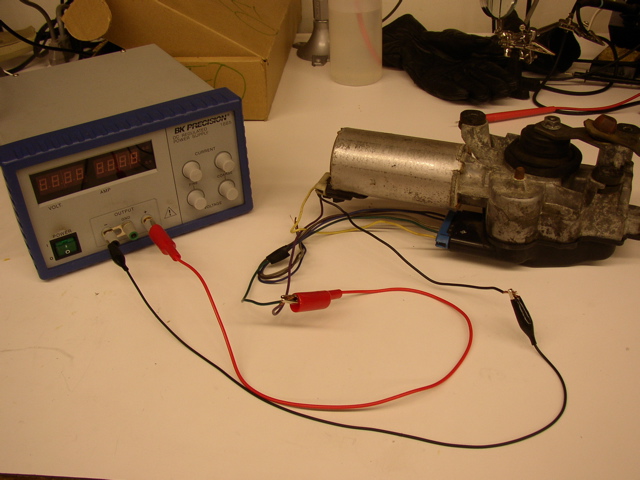
The windshield wiper motor shown below is from a 1996 Corsica. It is hooked up to a power supply which provides 12 Volts, 3 Amps to the motor.
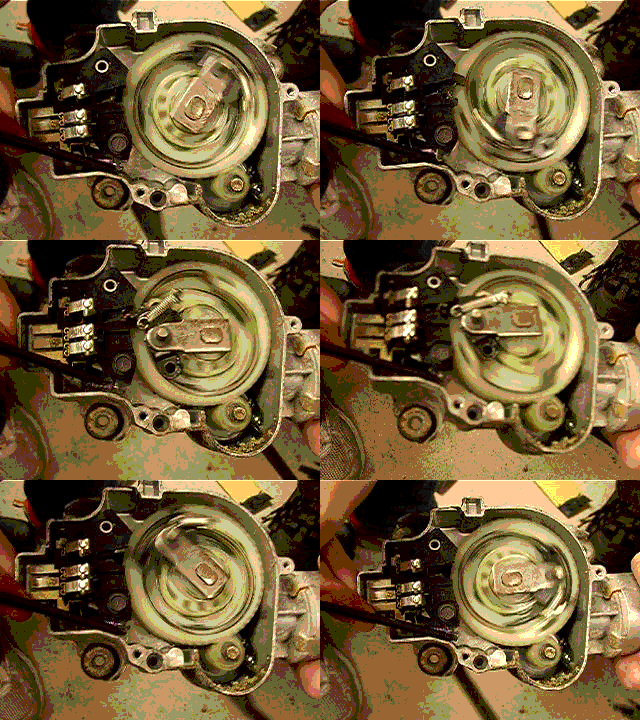
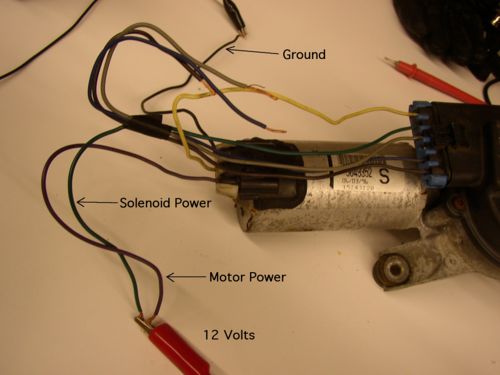
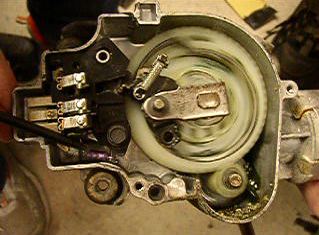
The picture below is a close-up of the wiring necessary to run the wipers. The black wire is ground, the purple wire supply the motor with power, and the green wire provides the solenoid with power. The solenoid acts as a switch to that allows a continuous rotation of the internal linkages. If this wire is not short circuited, as shown below, the first link will not rotate, and rotation will not be supplied to the wiper arm. Manual activation of this switch is can be viewed by clicking on the link: **. In this video, the switch is activated at the beginning and end of the clip. When the solenoid is supplied with power, the black switch is activated (thus putting the purple spring is put in tension) and the internal linkage rotates by fitting in the keyhole of the gear. When the solenoid is not supplied with power the internal linkage is fixed, causing a mechanism to snap into the keyhole once per rotation. We believe that this mode is necessary for a storage position of the wipers, causing them to fit under the hood. In actual use, the gear would only have one rotation on this this mode and would be activated at the end of wiper use.
As shown in the picture above, the motor translates rotational power to the wiper arms by a combination of a helical and worm gear. This gear reduction can multiply the power of the motor by about 50 times, as well as slowing the output speed to a desirable level. Worms gears are unique in that due to the angle of the teeth they can turn gears, but cannot be turned by other gears. This quality is good for windshield wiper motors because it acts as a locking system, preventing backspin. Helical gears are beneficial in this system because they are more quiet than most gears and are thrust bearing.
Should the design be pursued for production?
- A conclusion of whether or not your design should be pursued for production and why.
Next Steps
- Identification of next steps and any remaining barriers to bringing the proposed design into production.
Team Contributions
- A section on design process and team dynamics that briefly describes the design process path followed by the team and lists semester contributions and team roles from each team member.
Some teams may include additional information, such as a provisional patent draft, optimization results, functional decomposition, VOA, survey results, product family analysis, detailed cost estimation, etc. Each team should identify which aspects are appropriate for making the case for their own product and aim to impress the client with thorough and appropriate work necessary for the client to make a decisions on whether or not to pursue your product further.
References
Java Injection Molding Cost Estimatorv
[[1]]
LanXess websight:
[[2]]
PDF of propties of Lustran ABS 433 when using it for injection molding:
[[3]]


