Cartridge guitar bridge
From DDL Wiki
(→= Justification for Rail Design) |
(→Justification for Rail Design) |
||
| Line 25: | Line 25: | ||
Our final design attempts to combine all of the best aspects of the sample models we studied. We take the principle of the Speed Loader for quick and easy string replacement as a positive feature of out design. We maintain the simple and easy to manufacture quality of the Fender bridge with a simple die-cast design. By having out strings integral to the saddles, we eliminate most of the points for movement in a manner similar to the Floyd Rose. The things that we did not use are high costs and complex assemblies. | Our final design attempts to combine all of the best aspects of the sample models we studied. We take the principle of the Speed Loader for quick and easy string replacement as a positive feature of out design. We maintain the simple and easy to manufacture quality of the Fender bridge with a simple die-cast design. By having out strings integral to the saddles, we eliminate most of the points for movement in a manner similar to the Floyd Rose. The things that we did not use are high costs and complex assemblies. | ||
| - | === Justification for Rail Design === | + | ==== Justification for Rail Design ==== |
Originally, we planned to create new, triangular rail for our final design, replacing the double round rails. The triangular rails would reduce the part count, since they would be cast onto the base plate. We decided against using the triangular rails. Cast triangular rails would have made casting the bridge very difficult, since they are a convex shape, and would require very complicated molds. The tolerances on cast rails were also too high for comfort. Our final design is very dependent on the close tolerance of the rails for its tuning stability. The tolerance for the rail itself is 0.001in, while the hole is 0.003in. This allows a maximum of 0.003 in of give in the rail, which results in our exceptional tuning stability. Casting would not be able to achieve these close fits, resulting in a less than secure mate between the saddle and the base plate. This would have seriously affected the tuning stability. If the error was to the thicker side, the saddles might not fit on the bridge at all, or would require too much force to install. This would impact the user experience and perceived quality. | Originally, we planned to create new, triangular rail for our final design, replacing the double round rails. The triangular rails would reduce the part count, since they would be cast onto the base plate. We decided against using the triangular rails. Cast triangular rails would have made casting the bridge very difficult, since they are a convex shape, and would require very complicated molds. The tolerances on cast rails were also too high for comfort. Our final design is very dependent on the close tolerance of the rails for its tuning stability. The tolerance for the rail itself is 0.001in, while the hole is 0.003in. This allows a maximum of 0.003 in of give in the rail, which results in our exceptional tuning stability. Casting would not be able to achieve these close fits, resulting in a less than secure mate between the saddle and the base plate. This would have seriously affected the tuning stability. If the error was to the thicker side, the saddles might not fit on the bridge at all, or would require too much force to install. This would impact the user experience and perceived quality. | ||
Revision as of 02:06, 8 December 2008
Contents |
Executive Summary
Final Design
Concept Design
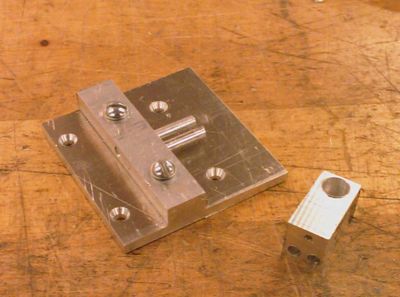
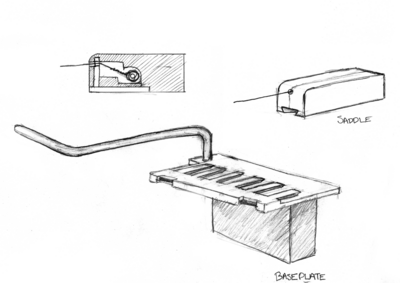
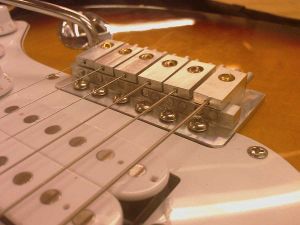
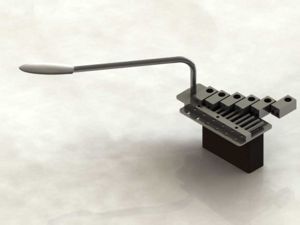
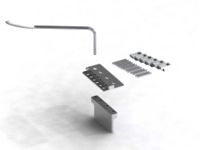
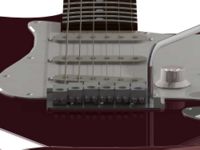
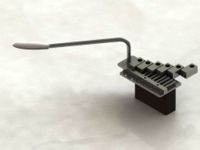
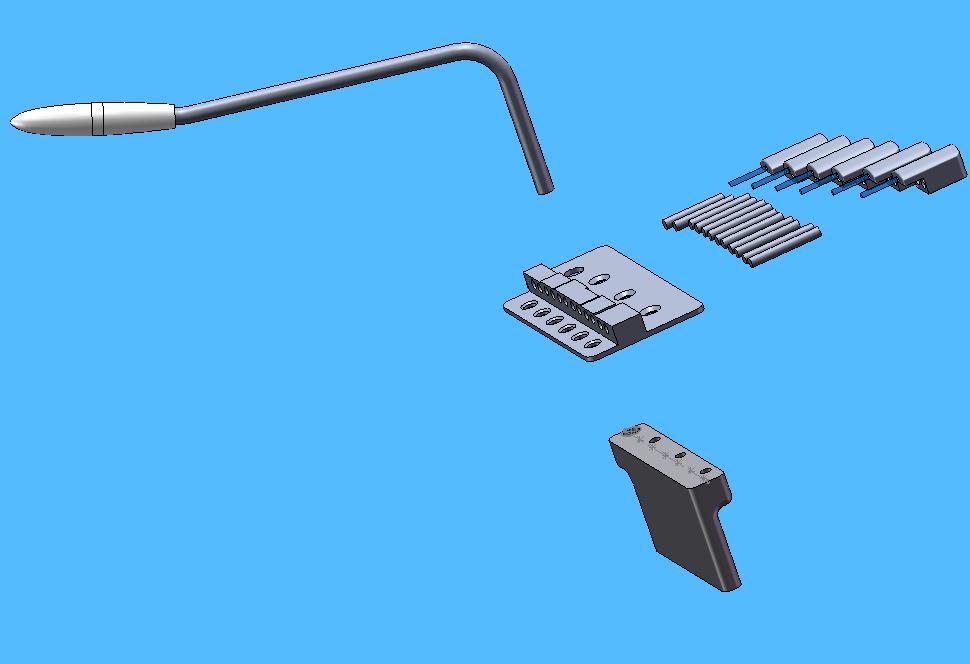
The Cartridge guitar bridge is an attempt to make a low cost guitar bridge with quality and functionality comparable to competing high-end models. The unique design features a cartridge that combines the string and saddle as one piece, which is easy to attach and remove and greatly reduces the amount of time to change a broken string. The saddle slides on and off of the bridge with twin rails, and is held in place by string tension and contact forces. Since the string is embedded in the saddle and the saddle has only a minute range of motion, the tuning stability of the cartridge model is as good or better than most high end bridges. Conversely, the design of our model is mechanically simple and would be easy to produce at a very low cost.
Comparison to Other Designs
There are many guitar bridge designs on the market today, and many more that were patented but never saw much use. In our comparisons we will focus on two specific designs, the Fender (a very common low-cost bridge, which has the majority share on the low end for tremolo bridges), and the Floyd Rose (a more high-end model which features better tuning capabilities but is more complex and much more expensive).
Standard guitar strings feature a ball end at one end of the string which is used to hold the string in place in the bridge. Our design uses a string that is die-cast into the saddle, reducing unwanted movements but increasing cost.
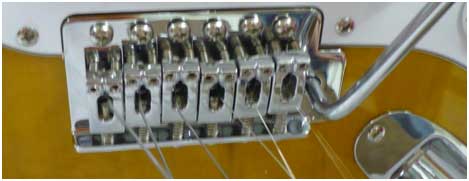
The Fender bridge is the basic bridge for an electric tremolo guitar. It uses standard strings, which are fed in through the back of the guitar into the sustain block. the saddles are attached with one spring and screw, and two additional screws are used to set the height but do not attach. the string is not connected to the saddle but rests in a notch on the top, the string tension holds the saddle in position. This causes some slight shifting when the tremolo is activated and the tension is lost.
The Floyd Rose is what we have studied as a high-end guitar bridge. it is far more complex than the Fender, and this is reflected in the higher manufacturing costs. The dominant feature of the Floyd Rose is its ability to clamp strings in place, enhancing its ability to keep its tune through multiple tremolo uses. the downside of this is that it takes a long time to change strings. The complex locking mechanism also makes tuning more difficult and time consuming.
A final design we consider is the Floyd Rose Speedloader. This modified Floyd Rose bridge uses custom strings with ball ends at both sides and offers the tuning stability of the Floyd Rose without the difficulty in restringing the guitar. The downside is that it costs even more than the Floyd Rose, putting it out of the range of many beginning guitarists.
Differences from Final Design
Our final design attempts to combine all of the best aspects of the sample models we studied. We take the principle of the Speed Loader for quick and easy string replacement as a positive feature of out design. We maintain the simple and easy to manufacture quality of the Fender bridge with a simple die-cast design. By having out strings integral to the saddles, we eliminate most of the points for movement in a manner similar to the Floyd Rose. The things that we did not use are high costs and complex assemblies.
Justification for Rail Design
Originally, we planned to create new, triangular rail for our final design, replacing the double round rails. The triangular rails would reduce the part count, since they would be cast onto the base plate. We decided against using the triangular rails. Cast triangular rails would have made casting the bridge very difficult, since they are a convex shape, and would require very complicated molds. The tolerances on cast rails were also too high for comfort. Our final design is very dependent on the close tolerance of the rails for its tuning stability. The tolerance for the rail itself is 0.001in, while the hole is 0.003in. This allows a maximum of 0.003 in of give in the rail, which results in our exceptional tuning stability. Casting would not be able to achieve these close fits, resulting in a less than secure mate between the saddle and the base plate. This would have seriously affected the tuning stability. If the error was to the thicker side, the saddles might not fit on the bridge at all, or would require too much force to install. This would impact the user experience and perceived quality.
We feel that although the rails add extra parts and assembly steps to our design, the end result justifies the extra cost, since it gives us our exceptional tuning stability, and ease of string changing. These two properties represent the main appeal of our design.
Design Changes from Prototype 3
The majority of the design changes from Prototype 3 involve manufacturing. While Prototype 3 contains a mix of hand machined and CNC machined parts, most of the parts on the final design will be cast out of aluminum. The saddle design is also slightly changed. This change simply reflects the fact that our mass produced saddles will be specially made with custom ends, while our prototype saddles adapt currently existing strings to fit our bridge.
The materials selection will also change slightly. Our prototype designs use several parts from our Fender bridge which are made of cast steel. Our final design will use mostly aluminum parts for weight and cost purposes. Several difficult to manufacture items, such as the screws, whammy bar, and springs will still be purchased. These parts are compatible with the standard Fender bridge.
CAD
Full CAD Drawings of our production model are available here.
Bill of Materials
Table 1: Bill of Materials
Unless otherwise noted, parts sourced from external vendors use vendor's photo.
Market Research
When examining the market potential for our product, it’s most important to see how similar products are faring currently. The most similar product currently on the market is the Floyd Rose Speedloader, which uses special strings to make stringing the Floyd Rose bridge easier. The ‘genuine’ Floyd Rose bridge listed online was priced at roughly 250 dollars. In comparison, a standard Fender bridge is priced at around 70 dollars. Additionally, the Speedloader strings are priced at between 9 and 12 dollars for 6 strings. In comparison, standard guitar strings sell for between 4 and 6 dollars for a pack of six, though the prices for both can vary if the strings are bought in bulk.
The market for our product would most likely exist in between the price points of the two bridges. It would most likely be to our advantage to price the product towards the end of the Fender bridge. The high end market is most likely already taken by the Floyd Rose and existing products, and is also less likely to invest in another technology if they see no reason to. Additionally, our product is mechanically simpler than the Floyd Rose, and the smaller number of parts makes it easier to produce less expensively.
Another solid reason to aim toward the low cost end of the market is that the main mechanical feature of our bridge is its ease of restringing. This is not a feature of the standard Floyd Rose, and therefore less experienced guitar players are less likely to know about the Speedloader feature’s availability. Advertising ease of restringing along with the ability to keep tune will help sell the product to novice guitar players.
The availability of the Floyd Rose Speedloader is important to acknowledge because it shows that a product can sell even if it requires specialized strings. The strings for our bridge will most likely sell in the same price range as the Speedloader strings, though it’s probably possible to sell them for a bit less. The fact that strings are a repeat purchase makes it very important to price correctly, as the strings may very well make more money than the bridges themselves. The difference in price between our strings and the Speedloader strings will probably be determined by manufacturing cost rather than a different profit margin.
Ultimately, the product is unlikely to fare well in a market that is fairly saturated without the backing of a guitar manufacturer. Floyd Rose gained a lot of notoriety on behalf of his product when Eddie Van Halen started using it. This advertising got Floyd Rose offers to license his bridge technology, and this is what really got the design its exposure. In our case, it’s doubtful celebrity advertisers will fall into our laps, but going and seeking a guitar company interested in our design may be the best way to approach the issue of marketing. A company like Fender may be interested in our design, as their two primary competitors already have products available aimed towards maintaining tunability: Gibson with their Robot guitar, and Ibanez with their licensed Floyd Rose bridges.
Floyd Rose’s design is successful, though its market share is still relatively low. Most likely, for our bridge design to succeed, backing of a major guitar company will be necessary. From earlier investigations, there are many patents for different bridge and string attachment mechanisms for guitars. Despite this, the majority of them are not seen in the market. For our design to succeed, the interest of an established company is likely the only way to gain the necessary exposure for the design to pay off. Given the right presentation and the right backer, our design has the right combination of better performance and simpler design to earn a place in the guitar market.
QFD
Conclusions
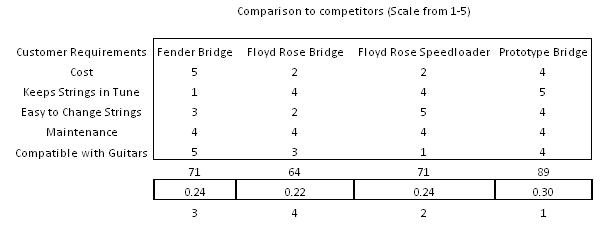
Using Quality Function deployment (QFD) to analyze some of our design decisions helped us make some important conclusions regarding our design and how it relates to similar designs on the market. The two most important characteristics of the design were how much the guitar would go out of tune, and how quickly strings could be changed. Based on how it affects the performance of the bridge and the guitar overall, the detuning of the guitar was the most important factor in the design. This changed our design philosophy slightly, and the manufacture of prototypes 2 and 3 focused more on fit and string stability than easy movement and restringing. This was also influenced by some research into the Floyd Rose Speedloader, a bridge design that can be restrung much more quickly than other designs on the market.
When compared to other designs on the market, our design has the best combination of traits as opposed to other designs. Because we considered all of the consumer needs in our design process, our bridge rates fairly highly on most of them. The other bridge designs, on the other hand, tend to be very strong in only a few areas. For instance, the Floyd Rose Speedloader holds tune very well and makes string changes very easy, but is both the most expensive bridge out of the ones we compared, and also requires a guitar to be built with the bridge, giving it the lowest score for compatibility with existing guitars. This comparison reinforces that our design offers a good compromise between performance, and complexity that would lead to higher cost.
User Data
We surveyed several guitar users with our prototype 3 bridge. All were impressed and enthusiastic about the improvements that our design implements. Two distinct issues arose that our users were concerned with. The first was our use of non-standard strings. Users were concerned less with cost than with availability – concerns of not being able to find strings locally for such a specialty item. We agree with this concern and are planning a conversion saddle for standard strings similar to the ones used in our prototypes. We would package six spare saddles with the bridge so the user could have a full set of saddles pre strung and ready to use.
The second issue that our users identified was our design's lack of a variable action. The action is a series of screws that can be altered to adjust the height and position of each saddle individually. Our model sacrifices this variability for better tuning stability and much lower production costs. None of the users we surveyed used this feature often, and most were satisfied with the preset positions that our bridge uses.
On positive features, our testers were very happy with the easy string changing capabilities of our bridge. Users who played our prototype were surprised with how well our model held it's tunning while playing, something they were not used to. Our testing gives us confidence that our design would be able to compete directly with low cost models currently on the market due to our simple design and high quality performance.
Prototype Design
Prototype 1
Prototype 1 was a proof of concept that our rail design bridge would work. It consists of a single saddle, and a small base plate. The base plate is constructed of two pieces of aluminum screwed together. The rails are glued in. We learned that the design was indeed feasible, and that the cartridge would not have tolerance issues with the manufacturing processes available to us. It was constructed in approximately 4 hours by Jeremy and Aaron.
Pictures
Prototype 2
Changes from Prototype 1
Prototype 2 was the first fully functional prototype. It consisted of a scaled up version of Prototype 1, with a few changes.
The Prototype 2 saddles were slightly shorter, will the string hole closer to the bridge. This put the strings at the same height as a Fender bridge. The Prototype 2 saddles also had a shelf cut out of them. This put the exit point of the string at the correct location for the scale of the guitar. The base plate is constructed out of two pieces of aluminum, a plate and the rail holder, which were screwed together. The rails were glued in place. The prototype was designed to reuse the screws, sustain block, and whammy bar from the Fender Bridge.
Prototype 2 was designed in Solidworks 2007 by Mike and Jeremy, and was constructed in the Machine Shop by Aaron, Mike, and Jeremy, and took approximately 25 man hours of work to build.
Pictures
Prototype 3
Changes from Prototype 2
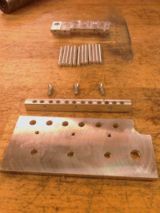
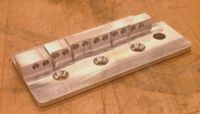
In terms of design, Prototype 3 was a minor departure from Prototype 3. It consisted mainly of small changes to optimize manufacturing and tuning stability. The base plate was condensed into one piece of aluminum instead of two, for ease of manufacturing, and eliminating three screws. Several of the screw holes were moved slightly. The saddle bar was designed to allow for correct intonation (small changes in the length of the strings to account for the different string thicknesses). It was also corrected for the string radius (strings are not all flat on the guitar, but curved around an imaginary radius for playing comfort). These changes made the design very complicated to machine, so it was done on the CNC Mill in the machine shop.
The saddles, sustain block, whammy bar, and screws were reused from Prototype 2. The rods were shortened from 1 inch to 0.75 inches.
Prototype 3 was designed by Jeremy in Solidworks 2007. The baseplate was manufactured on the CNC machine. The remaining parts were taken from Prototype 2, or manufactured in the machine shop by Aaron, Mike, and Jeremy. It took approximately 9 man hours to tweak and install Prototype 3. This figure does not count the CNC time for manufacturing the base plate.
Prototype 3 is very similar to our final design, with the exception of manufacturing methods. Prototype 3 was machined on a CNC and milled by hand. Most of the parts for the final design will be cast.
CAD
Full CAD Models for Prototype 3 are available here.
Pictures
Mechanical Analysis
Summary and Introduction
When designing our bridge, we decided to focus on creating an easy to use, affordable bridge, with superior ability to hold tune. Tuning is a major problem for current bridge designs, especially the Fender design. This issue is of great important to guitarist of all skill levels.
We first considered how the Fender Bridge works, to find problem features that allow the guitar to go out of tune. We then looked at our prototype design for similar problems. Using MATLAB, we calculated how these factors would effect the tuning. We then performed experiments on actual guitar bridges to determine their real world performance.
We also considered how the tremolo effects the frequency of vibration of the strings, which gave us insight into how a guitar bridge works.
Tuning Stability
In this design memo, we chose to examine the effect of the design flaws of the Fender bridge on the tuning of a guitar string. We then compared these effects to the simulated behavior of our Prototype 2 design. We found that the Fender Bridge offers very poor tuning stability, while our Prototype 2 design exhibits excellent tuning stability.
Saddle Slippage
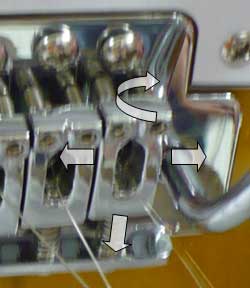
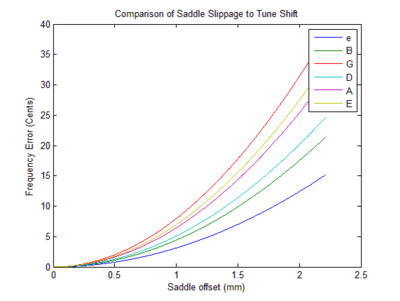
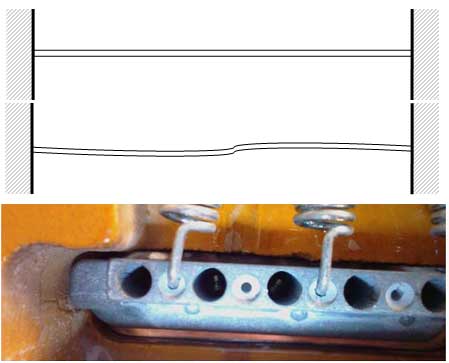
One major design flaw in the Fender bridge is that each string saddle is anchored only by a long screw, and the friction between the base-plate and saddle caused by string tension pushing the saddle down. This allows the saddle a great deal of freedom of movement and rotation, especially when the string is slack. On a guitar with no tremolo, this would not be a problem. However, on a guitar with a tremolo bridge, the strings can easily become slack if the user pushes the tremolo by an appreciable amount (by our first quantitative analysis, the G string will be completely slack at a 6.1 degree tremolo angle, and all strings except the high E string are flat by 10 degrees). The saddle is able to translate horizontally, describing an arc with the center at the point where the screw meets the bridge. The saddle can move forward and backwards, since the screw hole is not threaded on the bridge. Finally, the saddle can rotate around the screw. Of these movements, the most likely, is the horizontal translation. We simulated this phenomena using MATLAB.
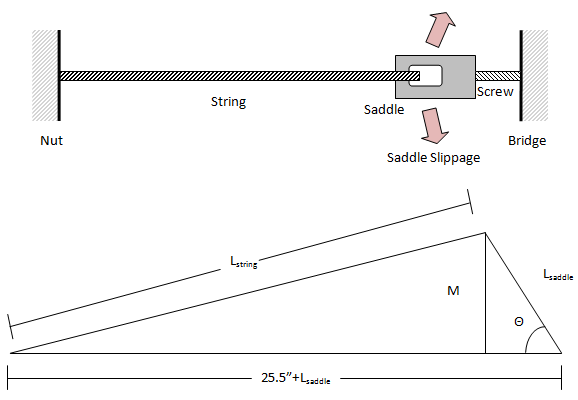
The guitar can be simply modeled as follows:
The angle Θ is the angle of the saddle with respect to its angle when it is correctly lined up. Theta will in general be very small, and difficult to measure. For this reason, we also define M as M= L_saddle sin(θ) . M is the horizontal translation of the saddle. This is easier to measure on a real guitar. Lsaddle is equal to 1”, so M is very small. For the purposes of our test, we chose to examine M in the range of 0 to 2mm, which corresponds to a range of Θ equal to 0 to 3 degrees. The 25.5” measurement is the length of the strings when they are in the neutral, correct position. The Lstring variable represents the length of the strings when the saddle is in the incorrect position. The relation between Lstring and M, or Θ is a simple matter of geometry.
The string can be modeled as a spring. The two ends of the string are fixed, so any change in length of the string while the guitar is being played means that the tension is also going up. In order to stretch the string from 25.5” to Lstring, the string tension goes up by:
Where T0 is the original, in-tune tension of the string. The frequency of a vibrating string is dependent on the tension, length, and linear mass of the string. All of these are known. For reference for the numbers we used, please see our first design report’s quantitative analysis. The strings are standard “light” guitar strings, which are the most common electric guitar strings sold.
Armed with these equations, we found the frequency change for each string. In order to display the data in a more intuitive format, we graphed the tune of the strings in units of cents. Cents are a logarithmic scale, with 100 cents between each musical note in the scale, or 1200 cents in an octave. A note that is 100 cents out of tune is has moved one piano key from its original tune. The average layman can hear a musical note that is 25 cents or more out of tune. A musician can hear a wrong tuning in the range of 5-6 cents.
The saddle slippage causes a relatively large amount of error that would be obvious even to untrained musicians.
Ball End Rotation
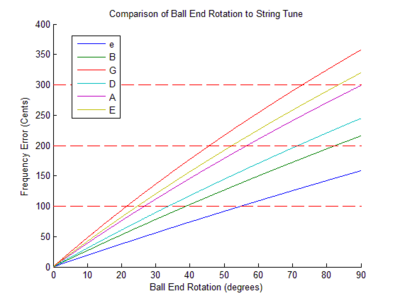
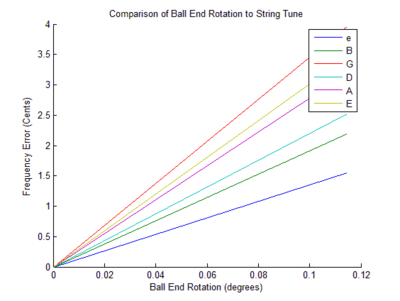
We also considered the tuning error caused by the ball end of the string rotating. In the Fender bridge, the ball end is held secure only by string tension. When the tremolo is used, and the strings are slack, the ball ends can rotate before being pulled taunt again. This rotation adds twist to the strings, which causes it to take a very slight helix shape. We approximated this by saying that the string takes on a helical shape with a diameter the same as the string diameter, and the number of turns equal to φ/360, where φ is the angle of rotation of the ball end. This change in length again changes stretches the string, changing the tension. However, the vibrating length of the string remains the same. In the case of ball end rotation, the string length changes, but the length between the nut and saddle does not change. This means, in effect, that the string stays the same length, while the tension gets higher. Using our frequency equations from above, we graphed the change in pitch from a rotated ball end.
The results of the graph were surprising. The strings very quickly went out of tune, even for a very small rotation of the ball end. The red dotted lines represent how musical notes out of tune the guitar is. For instance, at 70 degrees of rotation, the G string has gone from a G note (196.00 Hz) to a Bb (233.08 Hz). A rotation of 25 or 30 degrees would not be at all unusual, and an enthusiastic guitarist might easily have the ball ends rotate more than that.
Prototype 2
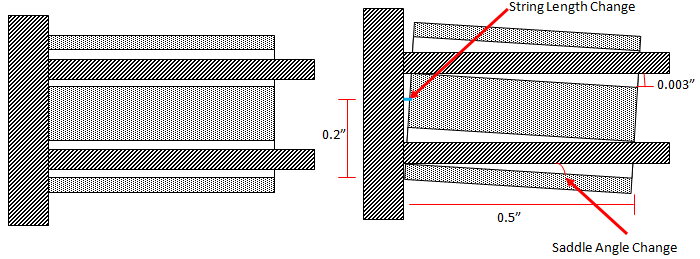
Our Prototype 2 Bridge design has neither of the previously addressed tuning issues. The string does not have a ball end, and is secured by epoxy inside the saddle cartridge. The saddle cartridge is secured to the bridge plate by two strong “rails” instead of one flimsy screw. Since the sliding fit we used on our saddles has a gap of only 3 thousands of an inch, the saddle can rotate very little, orders of magnitudes less than the Fender bridge. We used MATLAB to see how the little freedom of movement left to the saddle would affect the tune.
Where Wsaddle is the width of the saddle (0.4 inches), Tsaddle is the tolerance of the hole in the saddle (0.003 inches), and Lsaddle is the length of the saddle (0.5 inches). According to MATLAB, our maximum change in string length is 0.0012 inches, or 0.0305 mm. We plugged this into our frequency equations.
We only evaluated the Prototype 2 design at two angles, the “correct” neutral angle, and at the worst case scenario. It is unrealistic that the bridge would be at any angle besides these two, because the design is not held in place by friction, like on the Fender Bridge, but by normal forces from the rails and the front bridge stop. We can immediately see that our bridge design has excellent tuning stability. At the worst case, the G string is about 4 cents out of tune, which is inaudible even to a trained musician. This is 10x lower than even a well behaved Fender bridge. It is worth noting that the Floyd Rose bridge offers similar tuning stability to our own bridge. However, the Floyd Rose bridge caters to the upscale guitar market, while we intend our bridge for the lower end market, where the Fender Bridge is prevalent.
Experimental Data
In order to test our mathematical model, we created a standardized experiment, and ran it for several different types of guitar bridges. The experiment was conducted as follows:
Procedure
1) The guitar was put into exact tune using an electronic tuner. Standard EADGBe tuning was used with A = 440 Hz.
2) The whammy bar was depressed on the guitar as far down as it would go, then released.
3) The tuning of each string was recorded using an electronic guitar tuner.
4) This process was repeated five times.
5) Results were plotted using Microsoft Excel, with units of cents*.
* Cents are logarithmic units of tuning. There are 100 cents between adjacent musical notes (i.e. B and Bb). This means that a string that is 100 cents out of tune is one semitone flat or sharp. An untrained human ear can detect a tuning error of 25 cents, while a trained musician can detect an error of 4 cents).
This experiment simulates how the guitar will go out of tune as the whammy bar is used while playing. This is very important to guitarists, who need a guitar to stay in tune for a whole song, and prefer guitars that can stay in tune for many songs in a row.
We tested several different guitar bridge designs:
1) Fender Tremolo without Locking Nut 2) Fender Tremolo with Locking Nut 3) Bigsby with Locking Tuners 4) Floyd Rose with Locking Nut 5) Prototype 2 Bridge
After testing a Fender guitar without a locking nut, we decided this could be a source of error, installed one, and tested again. The nut is the small piece of plastic at the top of the guitar nut that holds the strings off the fretboard. The strings can get caught on the nut, which can affect the tuning of the guitar. Since we were not considering the nut for our design improvements, we installed a locking nut on the guitar to eliminate error. A locking nut incorporates a clamp onto the nut, so the string is not able to slip. Locking nuts are available for $10 and are easy to install. The Floyd Rose bridge system comes with a locking nut as standard.
Results
We found that the Fender bridge was by far the worst design for tuning stability, with or without the locking nut. Without the locking nut, the Fender strings detuned by 40 to 60 cents over the course of the experiment. The result of this would be a guitar that would be painful to listen to.
With the locking nut, the Fender bridge had tuning errors between 20 and 40 cents. Again, this would be easily (and unpleasantly) audible to a non-musical listener. The tuning errors we found for the Fender bridges are in line with our mathematical predictions for Saddle slippage, which predicted a maximum of 40 cents tuning error. The Fender bridge without a locking nut also exhibited an interesting behavior on the low E string, which immediately shot to 60 cents error. This is either due to ball end rotation (which predicts anywhere from 0 to 400 cents tuning error), or to the string slipping on the nut.
The Bigsby Bridge is another tremolo from the 1950s. It was more expensive and less popular than the ubiquitous Fender model. The reason for its extra cost became evident when we tested it. The tuning error remained below 20 cents for most of the strings, with the D string barely touching 25 cents of error at the end of the test. This would result in a guitar that remains in tune well enough to finish at least one song, while still sounding harmonious.
The Floyd Rose bridge also had excellent results. Over the course of five tests, the strings rarely strayed above 20 cents error, with a maximum error of about 30 cents for the G string. This means that the Floyd Rose would also be useful for guitarists who use the tremolo bar a lot, and want their guitar to stay in tune. It should be noted that the Floyd Rose equipped guitar we tested had very old strings, while the rest of the guitars had fresh strings. Old strings maintain tune poorly compared to newer strings, so this probably increased the tuning error of the Floyd Rose, which we expected to have even less tuning problems than the Bigsby.
Finally, our Prototype 2 bridge had phenominal results. Not only did it have very little tuning error (a maximum of about 15 cents), but it had excellent stability, indicating that the tuning error was likely to stay in the 15 cent range even if the tremolo was used many more times. Our mathematical predictions said that the tuning error for our bridge should be in the 0-4 cent grange. Our actual results are a bit higher. This is not surprising, since the tolerances on our prototype were much worse than those we assumed for a production model.
Error
There are a number of sources of error in our experiment. We assumed that the only cause of tuning instability comes from the bridge. This not the case. In guitars without locking nuts, much of the tuning instability comes from the nut and tuners. Since all of our guitars but one had locking nuts, this source of error is probably not important. Another source of error is the bending of the neck. The guitar neck is often assumed to be completely rigid, but in fact bends considerably while the strings are under tension. This bending is not always perfectly elastic, and can effect the tuning. The strings are modeled as ideal springs in our math, but of course real strings are not perfectly elastic. They undergo plastic as well as elastic deformation, and have inherent damping. This can also cause tuning changes. The electronic tuner is supposed to have an accuracy of +/- 1.5 cents. The display on the tuner is accurate to 2 cents. These also caused a lack of measuring precision.
Overall, we feel that the sources of the error are probably not a problem in our results. We feel that the error probably accounts for less than +/- 10 cents, which would only seriously affect the results on the Prototype 2 bridge. Our results are still in line with what our math predicted.
Musicality
In our first design report, we also extensively examined the proportional tuning of guitar strings as the whammy bar is depressed. This analysis was used as a tool to consider how to create a more musical whammy bar. This design feature was eventually abandoned when we decided to focus on building a low cost, highly tuning stable bridge. However, this analysis offers some interesting insight into how a guitar bridge changes the tune of a guitar. It can be accessed here:
Quantitative Analysis of the Musicality of an Electric Guitar Tremolo
Our design functions similarly to the Fender or Floyd Rose with respect to musicality, so the analysis is valid for our bridge.
Conclusions
From our mathematical analysis, our prototype design clearly offers better tuning stability than the Fender bridge. It does this by reducing the number of degrees of freedom allowed to the parts of the bridge, and tightening the tolerances on these degrees of freedom. Our manufacturing analysis will explain that we are able to do this without raising the cost much above that of a standard Fender bridge. The Floyd Rose bridge offers many of the tuning advantages of our design, but in a more complicated, expensive, and less user friendly package.
Our experimental analysis clearly shows that even in prototype form, the tuning advantages to our bridge are obvious. These advantages translate into the guitarist not needing to tune his guitar as often, which was our goal. The stability of the bridge also encourages the guitarist to use the tremolo more often, since he will not be afraid the guitar will go out of tune.
Our bridge design does not increase the musicality of the tremolo effect when compared to the Fender Bridge. On the other hand, all currently available bridges have the same problem, so it is not a disadvantage. However, it is certainly an area that merits further research. Our cartridge idea could easily be applied to a bridge that does improve upon musicality.
Manufacturing
Failure Mode Effects and Analysis
=FMEA= (note, not completed, just quick copy and paste) Failure Mode and Effects Analysis (FMEA) is a crucial tool in determining if a particular component in a system will fail (in terms of the customer's requirements). By looking at each piece, we can rate the severity of a failure (S), the probability that it will occur (P), and the likelihood that the customer would detect the failure (D). The severity of failure is rated between 1-10, 1 being the effect is not noticed by the consumer, while 10 is hazardous. Probability of occurence is also rated from 1-10, 1 being extremely remote while 10 has an extremely high chance of occurring. Finally, detection is rated from 1-10 with 1 being almost certain to detect and 10 being no chance of detection whatsoever. With these three factors, we can multiply them together to achieve a total risk priority number (RPN) which can range from 1-1000 (1000 being the greatest risk). Below is a table outlining each part.
Fender Failure Mode Analysis
| Item & Function | Failure Mode | Effects of Failure | S | Causes of Failure | O | Design Controls | D | RPN | Recommended Actions |
|---|---|---|---|---|---|---|---|---|---|
G1 Back Panel Cover Screw
| Screw holes may become stripped with frequent removal | Back panel no longer secure, lack of panel could cause harm to bridge internals or user | 4 | Screw holes become stripped | 4 | Test number of screw/unscrew cycles before failure on test guitars | 1 | 16 | Use metal inserts, or a latch system instead of wood screws on higher end guitars |
G2 Back Panel Cover
| Back panel may break when large amounts of pressure are put on it | Without back panel, the bridge mechanism can become fouled on user's clothing, may pinch user | 4 | Plastic plate cracks | 1 | Test force necessary to break back pannel | 2 | 8 | Use stronger plastic back plate, or a plastic/metal plate |
G4 Springs
| When springs removed for servicing, may shoot off | Harm to guitar, or user | 9 | Springs not adequately anchored | 3 | Measure spring tension at factory | 3 | 81 | Design springs to be easily removable, or create anchor cable to prevent spring from flying away (like a garage door spring cable) |
G5 Whammy Bar
| Shear failure at base | Broken handle, leading to an inability to use tremolo function without replacement. | 7 | Bar not strong enough near base | 2 | Test for imperfections using x-ray | 7 | 98 | Design bar to be thicker at base, where forces are greatest |
| Hard to tell if bar is inserted correctly | 3 | None (design flaw) | 1 | 21 | Design bar so it is difficult to insert incorrectly | ||||
G6 Bridge Mounting Screws
| With excessive use, the screws may become lose | Lose bridge, resulting in tuning problems | 3 | Bridge screws not tight | 4 | Measure screw tightness at factory | 2 | 24 | Use special screws designed not to work lose with operation of the bridge |
Floyd Rose Failure Mode Analysis
| Item & Function | Failure Mode | Effects of Failure | S | Causes of Failure | O | Design Controls | D | RPN | Recommended Actions |
|---|---|---|---|---|---|---|---|---|---|
FR1 Whammy Bar
| Shear failure at base | Broken handle, leading to an inability to use tremolo function without replacement. | 7 | Bar not strong enough near base | 2 | Test for imperfections using x-ray | 7 | 98 | Design bar to be thicker at base, where forces are greatest |
| Hard to tell if bar is inserted correctly | 3 | None (design flaw) | 1 | 21 | Design bar so it is difficult to insert incorrectly | ||||
FR2 Springs
| When springs removed for servicing, may shoot off | Harm to guitar, or user | 9 | Springs not adequately anchored | 3 | Measure spring tension at factory | 3 | 81 | Design springs to be easily removable, or create anchor cable to prevent spring from flying away (like a garage door spring cable) |
FR8 Clamp Screw
| Screw head becomes worn | Becomes impossible to unscrew screws, or change strings | 3 | Screw metal too soft | 3 | Measure screw hardness at factor | 2 | 18 | Use stronger metal for screws, or use screw head type more resistant to wear (Torx) |
FR11 Tuner Spring
| Spring bent when user services guitar | Spring provides inadequate pressure on tuners | 6 | Spring too easy to access | 3 | None (design flaw) | 1 | 18 |
|
| Spring too weak | 3 | None (design flaw) | 1 | 18 | Redesign spring to be thicker stamped piece | ||||
FR12 Baseplate
| "Knife Edges" become dull with use | Friction at pivot point increases, bridge ceases to return to pitch correctly. | 5 | Knife Edges not hard enough | 1 | Batch test knife edges for hardness | 3 | 15 | Use higher grade steel for knife edges |
| Too much pressure on knife edges | 8 | Design flaw, need pivot mechanism with larger contact area to spread pressure | 1 | 40 | Redesign pivot mechanism |
Prototype Failure Mode Analysis
| Item & Function | Failure Mode | Effects of Failure | S | Causes of Failure | O | Design Controls | D | RPN | Recommended Actions |
|---|---|---|---|---|---|---|---|---|---|
P1 Base Plate
| "Knife Edges" become dull with use | Friction at pivot point increases, bridge ceases to return to pitch correctly. | 5 | Knife Edges not hard enough | 1 | Batch test knife edges for hardness | 3 | 15 | Use higher grade steel for knife edges |
| Too much pressure on knife edges | 8 | Design flaw, need pivot mechanism with larger contact area to spread pressure | 1 | 40 | Redesign pivot mechanism | ||||
FR2 Springs
| When springs removed for servicing, may shoot off | Harm to guitar, or user | 9 | Springs not adequately anchored | 3 | Measure spring tension at factory | 3 | 81 | Design springs to be easily removable, or create anchor cable to prevent spring from flying away (like a garage door spring cable) |
FR8 Clamp Screw
| Screw head becomes worn | Becomes impossible to unscrew screws, or change strings | 3 | Screw metal too soft | 3 | Measure screw hardness at factor | 2 | 18 | Use stronger metal for screws, or use screw head type more resistant to wear (Torx) |
FR11 Tuner Spring
| Spring bent when user services guitar | Spring provides inadequate pressure on tuners | 6 | Spring too easy to access | 3 | None (design flaw) | 1 | 18 |
|
| Spring too weak | 3 | None (design flaw) | 1 | 18 | Redesign spring to be thicker stamped piece | ||||
FR12 Baseplate
| "Knife Edges" become dull with use | Friction at pivot point increases, bridge ceases to return to pitch correctly. | 5 | Knife Edges not hard enough | 1 | Batch test knife edges for hardness | 3 | 15 | Use higher grade steel for knife edges |
| Too much pressure on knife edges | 8 | Design flaw, need pivot mechanism with larger contact area to spread pressure | 1 | 40 | Redesign pivot mechanism |
Conclusions
From our FMEA analysis, it becomes obvious that because the Fender and Floyd Rose bridge share many design features, they also share many failure points. The Floyd Rose bridge is designed to improve on the Fender design, but most of these improvements have to do with everyday use, instead of failure points. Since there are several severe failure points on both bridges, it would make sense for a new design to incorporate fixes.
Many of the failure points on the guitar bridges do not have to do with material failure, but instead are the result of design flaws and/or user error. This fact makes it difficult to judge the "Dectectability" factor of the SOD method for analyzing failure modes. In cases where the failure is due to design problems or user error, we chose to use a detectability factor of 1, because all bridge ship with the potential problem.
The one failure point that stands out on both bridges is the possibility of the springs flying off the guitar when the user tries to remove them. These springs have the potential to cause a good deal of damage, both to the guitar (scratched paint), and to the user (spring in the eye). This failure point is also one of the easiest problems to fix. It would be easy to implement a safety cable similar to those used in garage door springs, to catch the spring when it is released from its mounting points.
Design for Manufacturing and Assembly
Design Process
General Overview
Our team worked relatively democratically. The team leader's responsibility was to schedule meetings and create schedules for the completion of various aspects of the project. Jeremy was the team leader for reports 1 and 2, and Mike was the team leader for the final report. In general, team members specialized in one area of the design, and wrote the corresponding section for each report. Jeremy concentrated on the quantitative analysis. Mike specialized in the user research. Aaron specialized in market and patent research, and Jonathan specialized in manufacturing analysis. Specialization allowed continuity between each report, as team members could build on their own previous efforts for each new report. Team members were kept updated on each others progress by frequent team meetings.
Next Steps
At this point, we have the designs for a demonstrable prototype. As discussed in the market research, in the current competitive guitar market, in order for a new bridge design to succeed, it needs the sponsorship of a major manufacturer. The next step for our team would be to take out a provisional patent, and to begin to demonstrate the design for various guitar companies.
Team Member Contributions
 |  |  | 
|
|---|---|---|---|
| Mike Harrison | Aaron Marks | Jonathan Kyle | Jeremy Ozer |
Aaron
- Shop work on prototypes 1, 2, and 3.
- Patent Research on Report 1.
- Market Research on Report 3.
- Quality Function Deployment (QFD) on Reports 1, 2, and 3.
Jeremy
- Shop work on prototypes 1, 2, and 3.
- Solidworks design on prototypes 2 and 3.
- Team Organizer on Reports 1 and 2
- Quantitative Analysis on Report 1, Design Memo, and Final Report
- Report Editor on Report 1
- Guitar Experimentation
- User Research
- Photography
- CAD Renderings
- Accounting, Purchasing, and Budgeting
Jonathan
- Product Design Analyst
- DFMA, DFE, FMEA
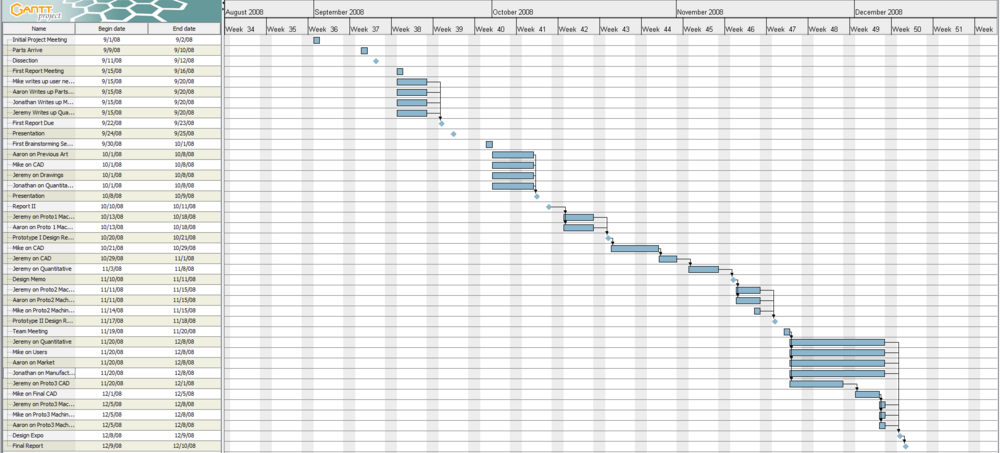
- Gannt Chart
- User Surveys
- Report 2 Editor
Mike
Gantt Chart
Appendix A: MATLAB Code for Mechanical Analysis
Whammy Bar Musicality Analysis MATLAB Code is available here.
Tuning Comparison MATLAB Code is available here.
